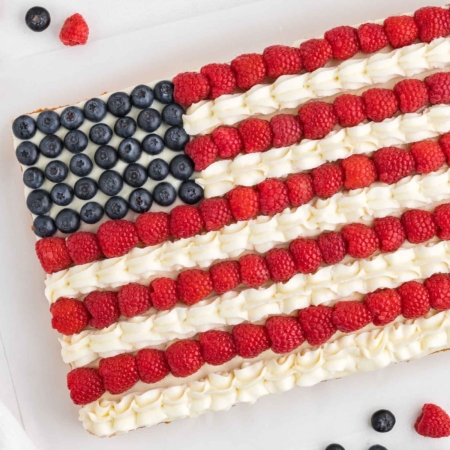
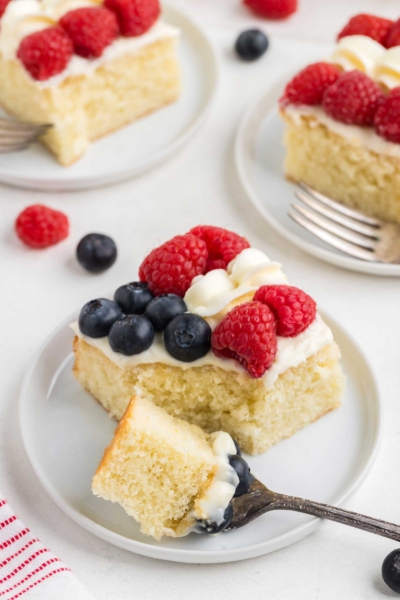
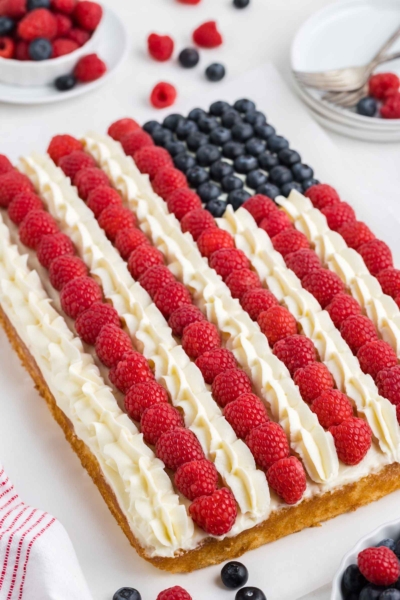
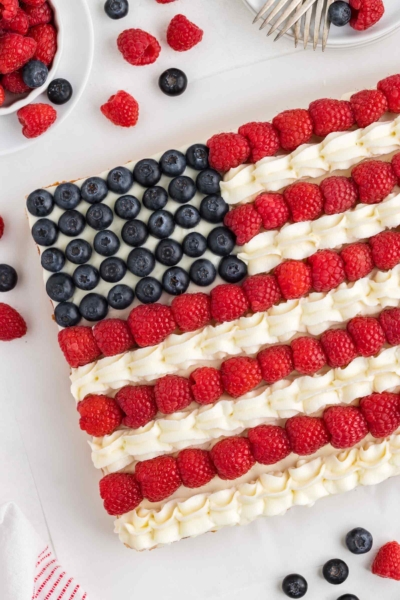
This Independence Day cake has a US flag on top and is easier to make than you might think! It has a super fluffy lemon base, but that’s easy enough to transform into an orange, almond or coconut cake. You can make it traditionally with all-purpose flour, with white whole wheat flour, or with one of the two gluten-free flours I’ve tested it with.
This cake is, unfortunately, super last minute, with tomorrow being Memorial Day. But if you can’t manage to make it tomorrow, there’s still July 4th coming up! I even called it an Independence Cake cake. 🙂
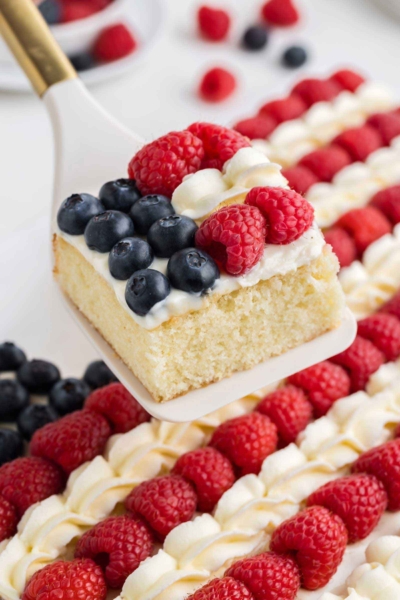
The cake base is an adaptation of the amazing King Arthur Flour vanilla cake recipe I used in my Christmas Tree Cake, Vintage Heart Cake and Snowman Cupcakes. I’ve made a few tweaks, such as using less sugar and adding a burst of flavor with lemon extract and lemon zest.
If lemon isn’t your thing, I’ve listed 4 other flavor options below.
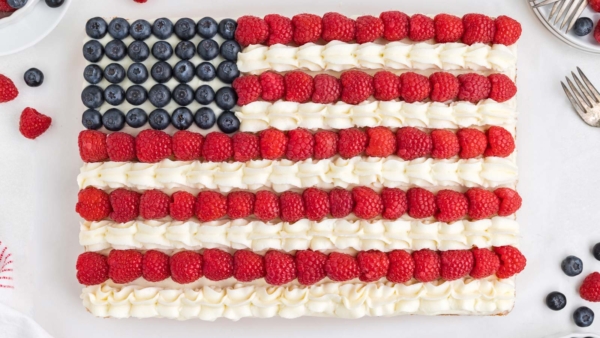
It’s definitely my favorite non-chocolate cake recipe. Even without the extra sugar, it’s still wonderfully sweet, and you won’t even notice it’s missing.
Here’s their original recipe, and below, you can see a video of them (that’s not me!) making the cake batter.
Prefer a chocolate base?
If you’d like to use a chocolate cake base, you can use my Healthy Chocolate Cake Recipe and bake it in a 9″x 13″ pan. If you don’t want to make a healthy cake, you can just use all-purpose flour and granulated sugar. These options are already listed in the recipe.
The bake time in a 9″x 13″ pan will vary widely depending on the combination of sugar, eggs, and flour used.
I recommend you start checking the cake at 20 minutes and then every 3 minutes after that.
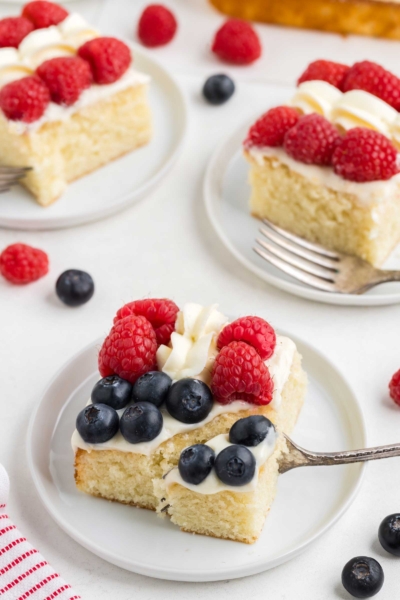
You’ll want to bake the cake until a toothpick comes out of the center with a few moist crumbs, but not raw liquid. Don’t wait for it to come out totally clean, or it will be overbaked and dry.
I tried it myself for this flag cake, and it worked out great.
Ingredients
For the cake:
- Flour – you can use all-purpose flour, white whole wheat flour, or if you’re gluten-free, King Arthur Flour Gluten-free Measure for Measure Flour or Bob’s Red Mill Gluten-free 1-to-1 Baking Flour. I talk about which one I prefer at the bottom of the post.
- Baking powder + salt – you must use baking powder and not baking soda.
- Eggs – this recipe calls for 4 eggs, and substituting with an egg replacer wouldn’t work. Beating the eggs with sugar contributes to an airier cake, a result that won’t happen with egg replaces. Whenever I make cakes that call for more than 1 egg with an egg replacer, the result is usually gummy and rubbery. So 4 is definitely too many!
- Granulated sugar – no sub here.
- Lemon/orange/coconut/almond extract + vanilla extract – if you just want vanilla flavor, use all vanilla extract instead of a mix of vanilla and lemon, orange, coconut or almond extract.If you’d like to make an orange cake, note that you’d need to use orange extract, not orange juice. The amount of extract called for is so little that using orange juice would have zero effect on the taste.And adding enough orange juice to affect the taste would negatively impact the cake’s structure. If you want to use coconut or almond extract, omit the zest. Or not! Maybe it’s good, but I haven’t tried it. And almond extract + raspberries and blueberries is a fantastic combination. Lemon is my favorite with the almond extract version coming in at a close second.
- Milk – you can use whatever type of milk you’d like. Even canned coconut milk works as long as you thin it down to a consistency similar to regular milk. Note that using coconut milk may add coconut flavor to the cake.
- Oil – you need to use an oil that remains liquid at room temperature, such as vegetable oil, canola oil, or a light olive oil. But keep in mind that olive oil has a distinct taste, which you’d probably be able to taste in the final product.
- Butter – for a dairy-free version of the cake base (remember, though, the frosting is not dairy-free), you can substitute more oil for the butter. Just use 1/2 cup + 1 tablespoon of oil in place of the butter + oil. I tried it out, and it works great. The flavor of the cake is better with butter, though.
- Lemon zest – if you’re using lemon extract instead of almond or coconut extract, then adding lemon zest is highly recommended. And if you use orange extract, then use orange zest.
For the frosting:
In addition to vanilla extract and salt listed above, you also need:
- Cream cheese – no subs are possible if you want to make cream cheese frosting. Same with the other ingredients for the frosting listed below.
- Powdered sugar – if it’s super lumpy, you might want to sift it or blitz it in a high-speed blender to make it light and powdery again.
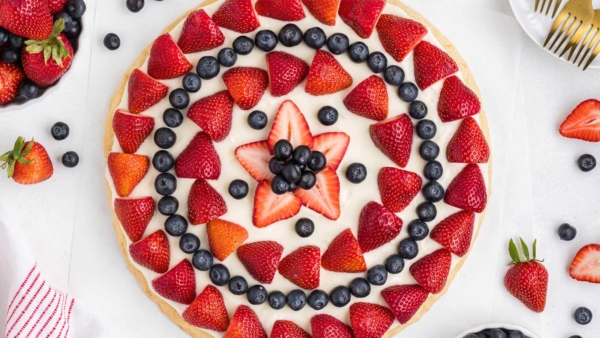
- Heavy cream – this is to make the frosting lighter. I usually use butter, cream cheese and powdered sugar in my cream cheese frosting, but preferred this lighter version since there’s quite a bit of frosting piped between the raspberries. It’s actually the same topping that I used in my 4th of July Fruit Pizza recently!
If this cake seems too much trouble, that fruit pizza is super quick and easy to put together. And the only decorating you need to do is place on the berries!
To decorate the cake:
- Raspberries – you need 65 raspberries if making 5 rows of raspberries or 70 if you want 6 rows.1 cup = 23 raspberries / 125 grams / 4.4oz. That means you need about 353 grams / 12.4oz of raspberries for 5 rows or 380 grams / 13.4oz for 6 rows.If you only want 5 rows and you’re tempted to get a 12-oz container – you usually get a few ugly or smushed berries per container, so an 18-oz container is really best.
- Blueberries – you only need 35 blueberries. For me, this was 3/4 cup or 100 grams / 3.5oz. It’s better not to choose huge blueberries, as then the blue section is too large. I used medium-sized blueberries.
Prefer cake mix?
If you don’t feel like making the cake from scratch, you can use a cake mix. I believe all cake mixes give directions on how to bake them in a 9″x13″ pan.
So follow the preparation and baking instructions on your cake mix box, and then come back here for the frosting recipe and how to assemble the flag cake.
How to make the cake
Making this cake requires just a few extra minutes compared to a one-bowl recipe. But really, the extra effort is definitely worth the time!
This is even truer for those who follow a gluten-free diet. I’ve never found a more delicious gluten-free lemon cake recipe.
This is why it took me 13 years of blogging to finally post one. I just didn’t like any of the others enough to post!
The full recipe is at the bottom of the post, but here’s a quick overview of what you need to do.
Although heating the milk and beating the sugar and eggs might seem like an extra 3 minutes of effort, it’s an essential step. Scalding the milk helps eliminate whey protein, which can weaken gluten and affect the rise of yeast dough and cakes.
I usually make this cake with cashew milk and gluten-free flour, and I wondered if this step was necessary without the presence of gluten and whey protein. But I found that skipping this step resulted in a noticeably less airy cake.
The reason for this remains a mystery to me, and I’d appreciate any insights from those who might know. 🙂
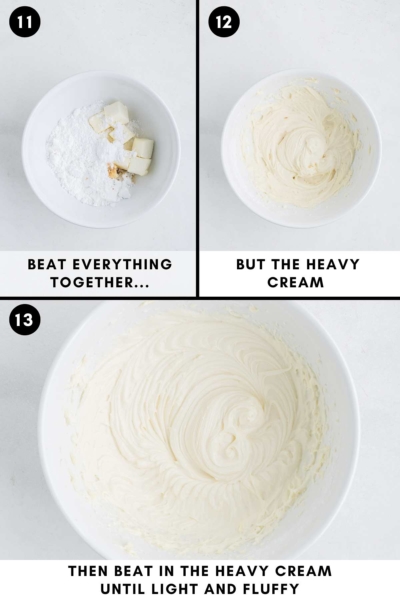
 The frosting
As I mentioned before, this is a lightened-up cream cheese frosting. However, you can certainly use a traditional cream cheese frosting recipe.
If you want to pipe it on like I did, make sure your frosting is firm enough to pipe.
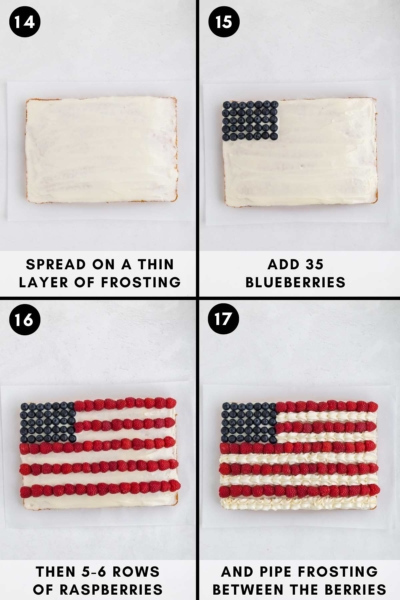
How to decorate a flag cake
Don’t want to be bothered with piping the frosting between the raspberries?
Then, instead of just a thin layer of frosting under the berries, you can spread on all of the frosting. Then, you put on your berries, and you’ll have a US flag design on your cake.
You can see what that looks like in step 16 above. I think it’s still quite nice!
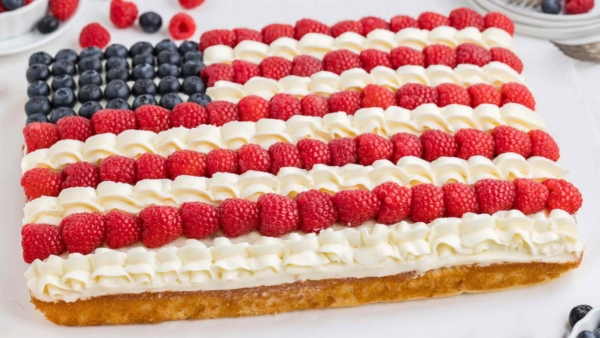
I just thought it looked better with some white frosting piped between the raspberries.
How to pipe on the frosting
I used Wilton tip 1M to pipe the frosting between the red rows of raspberries.
Here’s a video of how you do the piping. It starts playing at the exact border I used, so you don’t need to watch all of them to get what you need for this cake.
“Your flag is all wrong! It needs 7 red rows!”
Indeed. If you have a strangely sized pan that would fit 7 rows, you can certainly make 7 rows.
You can make 6 rows instead of 5 if you keep the cake in its pan. Then the cake pan will provide support to keep the bottom row in place.
You’d also have to squish in the layers a bit more below the blueberry section, which may or may not make it look messy. You could always use a smaller tip to do the piping, which would make it easier to get in 6 rows.
Make in advance
You can bake, cool and tightly cover the cake pan with plastic wrap. The unfrosted cake can sit at room temp for 2 days, or you can refrigerate it for up to 3 days.
You can also freeze the unfrosted cake for up to 3 months. But I don’t recommend freezing the frosting.
Regular cream cheese frosting freezes well, but the whipped cream in this recipe complicates things. I haven’t frozen it, but freezing whipped cream is generally not recommended.
How to store + transport
You should keep the decorated cake refrigerated until ready to serve. If you’re bringing it to a picnic, having it out for a few hours is fine – if it’s not super hot.
I haven’t actually experimented with having this sit out for hours in the heat, but cream cheese frosting isn’t the best choice for hot summer days. If it’s hot, I’d try to bring the cake in a cooler and bring it out when it’s dessert time.
And if you’re transporting the cake, make sure to transport it in its pan. That’ll guarantee that berries don’t fall out!
For another fun July 4th treat, these Strawberry Cheesecake Parfaits look like a great choice! Just throw in some blueberries for a red, white and blue theme. 🙂
And for a healthier treat, try these Cherry Crumble Bars!
Gluten-free version
My photographer used all-purpose flour in this recipe, and I’ve also, of course, tested it that way. But when making this cake base for myself, I always use King Arthur Flour Gluten-free Measure for Measure Flour.
The appearance, taste and texture are identical.
My quest for the ultimate gluten-free vanilla cake is over! This cake is perfect, and that’s saying a lot coming from someone who almost always favors chocolate over vanilla.
Some gluten-free cakes taste great right out of the oven but gradually become denser throughout the day. Other recipes result in an odd texture right from the start.
I can’t emphasize enough how many disappointing recipes I tried before discovering this one. There are a lot of bad ones out there. 😆
The only other brand I’ve tested this cake with is Bob’s Red Mill 1-to-1 Gluten-free Baking Flour.
The cake is a little taller and fluffier when made with King Arthur. The cake with Bob’s is a bit denser but not rubbery or a bad kind of dense.
And it’s not dense like a cake made with almond paste or something like this Cranberry Almond Cake. Maybe dense isn’t the best way to describe it.
It’s just not as fluffy. And the edges of the cake aren’t as neat-looking, but I don’t think that really matters since you’ll be frosting the cake.
One final difference is that the Bob’s version was slower to cook in the middle, which made it more difficult to determine when the cake was ready.
I haven’t experimented with other brands, so I really have no idea if they’d work. I’d hate for your cake not to come out perfectly, so I really recommend King Arthur or Bob’s.
If you try out another brand, please share the results below, and I’ll update the post with your tip.
Almond flour, coconut flour, or any substitutes not intended as a 1:1 replacement for all-purpose flour would not work at all.
That’s it! I hope you’ll enjoy this Independence Day cake if you try it out. 🙂
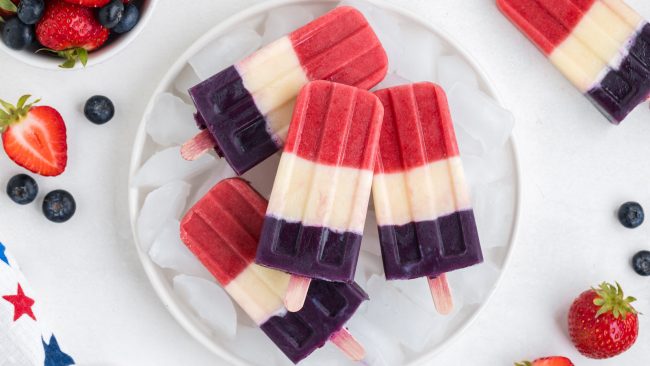
And if you’d like something without any refined sugar, check out the Red, White and Blue Popsicles I posted over on my other blog!
Independence Day Cake
Ingredients
For the cake:
- 2 cups (240 grams) all-purpose flour or for gluten-free, King Arthur Flour Gluten-free Measure for Measure Flour
- 1 1/4 teaspoons salt
- 2 teaspoons baking powder
- 4 large 50 grams each, out of shell eggs, room temperature
- 1 3/4 cups (350 grams) granulated sugar
- 2 teaspoons lemon extract
- 1 teaspoon vanilla extract
- 1 cup (236 ml) whole milk
- 2 tablespoons lemon zest
- 1/4 cup (56 grams) unsalted butter, cut into pats
- 1/3 cup (67 grams) canola or vegetable oil
For the frosting:
- 12 ounces (340 grams) cream cheese see notes if you live outside of North America
- 2 cups (240 grams) powdered sugar
- 1/2 teaspoon vanilla extract
- pinch of salt
- 1/2 cup (118 ml) heavy cream
For decorating:
- 6 oz (170 grams) blueberries see notes
- 18 oz (510 grams) raspberries see notes
Instructions
Make the cake:
- Place the rack in the center of the oven. Preheat the oven to 325°F (163 °C) with a rack in the center of the oven. Line a 9”x13” pan with a piece of parchment paper.
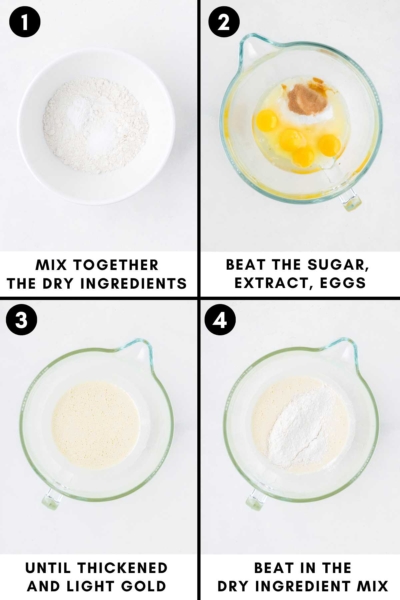
- In a medium mixing bowl, stir together the flour, salt, and baking powder. Set aside.
- In a large mixing bowl with an electric hand mixer or a stand mixer with a whisk attachment, beat the eggs, sugar, vanilla extract, and lemon extract at medium-high speed for about 2 minutes until it's thickened and a light gold color. Should your stand mixer not have a whisk attachment, then beat the mixture for 5 minutes using the paddle attachment.
- Beat in the dry ingredients on low speed just until combined. Use a silicon spatula to scrape the bottom and sides of the bowl and mix briefly to incorporate.
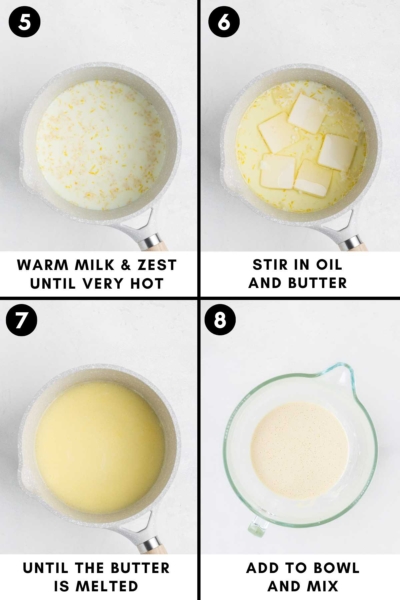
- In a small saucepan, heat the milk and lemon zest over medium heat. You shouldn't let it boil. When you see tiny bubbles start to appear around the edge of the saucepan, it's ready. The temperature will be 180-185 °F (82-85 °C). Remove the pan from the heat and stir in the butter and oil until the butter has melted.
- Slowly stir the milk mixture into the batter at low speed and mix until totally combined.
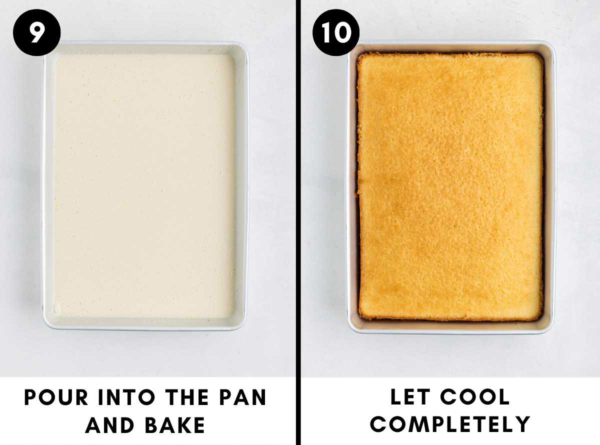
- Bake the cake for 33-40 minutes or until the edges are pulling away from the sides of the pan, a toothpick inserted into the center comes out clean, and the top feels set. A digital thermometer inserted into the center of the cakes should read 205 °F.
- Remove from the oven and place on a wire rack to cool completely, about 2 hours (if decorating the cake right away - read the section below). You can bake, cool and tightly cover the cake pan with plastic wrap. The unfrosted cake can sit at room temp for 2 days, or you can refrigerate it for up to 3 days. You can also freeze the unfrosted cake for up to 3 months. But I don’t recommend freezing the frosting.
One hour before beginning with the rest of the cake:
- Place your mixer beaters and mixing bowl in the fridge for 1 hour before making the frosting.
- Also, rinse and lay the berries out on paper towels so that they’ll dry. Place some paper towels on top, as well, to really soak up any water. This will prevent the frosting from getting runny.
Make the frosting:
- In a large mixing bowl, beat the cream cheese, powdered sugar, vanilla, and salt using an electric hand mixer or stand mixer at medium speed until completely combined.
- While still mixing, now on low, gradually add the heavy cream.
- Once it’s well incorporated, turn the speed to high and beat until stiff peaks form - about 3 to 5 minutes.
Decorate (preferably day of serving):
- Spread 1 1/4 cups (258 grams) of frosting over the cake, adding another 2 tablespoons or so to the upper left section, where the blueberry section will go. It’s a very thin layer of frosting that goes under the fruit, and additional frosting isn’t going to be piped onto the blueberry section, so that area gets a little more frosting.
- Use the berries to create a US flag design on top of the cake. In the upper left corner, make a 7x5 section of blueberries.
- Create 5 red rows of raspberries. I put them on their sides and shoved the next raspberry a bit inside of the other to create a more solid red line.
- Use Wilton tip 1M to pipe the frosting between the red rows of raspberries.
How to store:
- You should keep the decorated cake refrigerated until ready to serve.
Notes
- You need 65 raspberries if making 5 rows of raspberries or 70 if you want 6 rows. 1 cup = 23 raspberries / 125 grams / 4.4oz. That means you need about 353 grams / 12.4oz of raspberries for 5 rows or 380 grams / 13.4oz for 6 rows. If you only want 5 rows and you're tempted to get a 12-oz container - you usually get a few ugly or smushed berries per container, so an 18-oz container is really best.
- You only need 35 blueberries. For me, this was 3/4 cup or 100 grams / 3.5oz. It’s better not to choose huge blueberries, as then the blue section is too large. I used medium-sized blueberries.
- If you’re located outside the US or Canada, you most likely have the spreadable cream cheese that's meant for toast. Place 450 grams of cream cheese in the center of a clean tea towel or cheesecloth (not just a paper towel), and gently squeeze out the excess liquid until you have 340 grams of cream cheese.

 The frosting


Comments & Reviews
Charlotte Moore says
This looks wonderful!
Erin @ Easy Wholesome says
Thank you! I hope you’ll get to try it out. 🙂 I hope you’re having a nice summer!