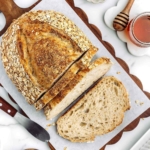
Honey Oat Sourdough
Soft and tender honey oat sourdough bread with a subtle honey sweetness and rustic oat-coated crust.
Servings 16
Calories 126kcal
Ingredients
Hydrated Oats
- 60 grams old-fashioned rolled oats
- 80 grams water approximately 170°F
Dough
- 100 grams active sourdough starter
- 300 grams water, divided approximately 68-75°F (20-24°C)
- 30 grams honey
- 400 grams bread flour or higher-protein all-purpose flour see notes
- 50 grams whole wheat flour
- 10 grams kosher salt
- additional flour for dusting and shaping as needed
- additional rolled oats for coating as needed
Instructions
- Combine the rolled oats and 80g of the water, heated to approximately 170°F (77°C), in a small bowl. Stir well to make sure all of the oats are moistened. Cover and let sit for at least 30 minutes, or until the oats are soft and have absorbed the water. Set aside to cool completely before adding to the dough.60 grams old-fashioned rolled oats, 80 grams water
- Add the active sourdough starter, 280g of the room-temperature water, and honey to the bowl of a stand mixer fitted with a dough hook. Mix briefly on low speed until the starter and honey are evenly distributed.100 grams active sourdough starter, 300 grams water, divided, 30 grams honey
- Add the bread flour and whole wheat flour. Mix on low speed just until no dry flour remains and a rough dough forms. Cover and let rest for approximately 30 minutes.400 grams bread flour or higher-protein all-purpose flour, 50 grams whole wheat flour
- Add the salt and begin mixing on low speed. Gradually add some or all of the remaining 20g water as needed. Continue mixing until the dough becomes smoother, more elastic, and develops enough strength to pass the windowpane test. To test the dough, take a small piece and gently stretch it between your fingers. It should stretch thin enough to see light through it without immediately tearing.10 grams kosher salt
- The windowpane test is more important than the mixing time. In a KitchenAid-style stand mixer, this may take approximately 8-10 minutes, but mixing time will vary depending on your mixer, flour, speed, and dough temperature. Do not continue mixing simply to reach a specific amount of time if the dough has already developed sufficient strength.
- Check the dough temperature during mixing if possible. A finished dough temperature around 75-78°F (24-26°C) is ideal, although a slightly warmer or cooler dough can still work. If the dough becomes too warm during mixing, stop the mixer and allow the dough to rest and cool before continuing. Mixer friction can raise the dough temperature quickly, particularly if the mixer bowl is already warm from a previous batch.
- Once the dough passes the windowpane test, add the cooled hydrated oats. Mix on low speed for approximately 1-2 minutes, or just until the oats are evenly distributed. Avoid prolonged mixing once the oats have been added.
- Transfer the dough to a lightly greased or dampened bowl or dough container. Using damp hands, gently fold the dough over itself 2-3 times to bring it together into a cohesive ball and encourage even distribution of the oats. This does not count as one of the formal coil folds.
- Cover the dough and let rest for approximately 30 minutes.
- Perform a coil fold. With damp hands, gently slide both hands underneath the center of the dough and lift it upward, allowing the ends to stretch and drape underneath. Lower the dough back into the bowl, then rotate the bowl and repeat on the opposite side. The goal is to gently strengthen the dough without aggressively stretching or tearing it.
- Perform a second coil fold approximately 30 minutes later. If the dough still feels particularly slack, you can perform one additional gentle coil fold another 30 minutes later. If the dough already feels strong and holds its shape well, two coil folds are sufficient.
- Continue bulk fermentation after the final coil fold. The time spent resting between and after the coil folds is part of the total bulk fermentation time. The total fermentation time will vary depending on your dough temperature, room temperature, starter activity, and environment.
- The dough is ready to shape when it has increased in volume by approximately 30-50%, looks noticeably puffy and aerated, has bubbles visible around the edges and throughout the dough, and jiggles gently when the bowl is moved. The dough does not need to double in size.
- Lightly flour your work surface if needed and turn out the dough. This is a soft, sticky dough, so don't be afraid to use a small amount of additional flour if necessary. If your dough feels manageable, use very little flour. A bench scraper is particularly helpful for handling and shaping this dough.
- Gently pre-shape the dough into a loose round or oval, depending on your desired final shape. Let rest uncovered for 15-20 minutes.
- Shape the dough into a tight round or batard, creating enough surface tension to help the loaf hold its shape without aggressively tightening or deflating the dough.
- Place a generous layer of rolled oats on a plate or shallow dish. Lightly mist the outside of the shaped loaf with water, then carefully transfer the dough to the oats using a bench scraper. Gently roll the loaf through the oats and lightly press the oats into the surface so they adhere. Applying the oats before the loaf goes into the banneton will give you the most secure and even coating.
- Lightly dust a banneton with flour. A heavy coating is not necessary because the oats help prevent the dough from sticking, but a light dusting provides additional insurance. Place the shaped loaf seam-side up in the prepared banneton.
- Cover and refrigerate for 12-16 hours.
- Place a sheet pan on the oven rack below where your Dutch oven or bread oven will sit. This helps protect the bottom of the loaf from excessive direct heat and browning.
- Preheat the oven to 475°F (245°C). Once the oven has reached 475°F (245°C), place the Dutch oven or bread oven inside and allow the baking vessel to preheat for an additional 25-30 minutes.
- Remove the cold dough from the refrigerator and carefully turn it out onto parchment paper. If the dough feels particularly soft after the cold proof, you can place it in the freezer for approximately 15-20 minutes before turning it out and scoring. This is simply to firm the dough and make handling and scoring easier.
- If you notice an area where the oat coating is particularly sparse after turning the dough out of the banneton, lightly mist that small area with water and gently press a few additional oats onto the surface. This is optional and purely aesthetic; don't try to completely re-coat the loaf at this stage.
- Score the loaf with a sharp bread lame or razor using one confident, long cut.
- Carefully transfer the loaf to the preheated Dutch oven or bread oven and cover.
- Bake covered at 475°F (245°C) for approximately 25-30 minutes, checking the internal temperature toward the end of this time. The center of the loaf should be approaching approximately 195–200°F before removing the lid.
- Reduce the oven temperature to 425°F (220°C) and remove the lid. Continue baking uncovered for approximately 5-10 minutes, watching the crust and oat topping closely. In testing, approximately 7 minutes uncovered produced the best balance of a deeply golden crust and pleasantly toasted oats.
- The loaf is finished when the crust is deeply golden and the center reaches approximately 205-210°F (96-99°C).
- Transfer the bread to a wire rack and allow it to cool completely before slicing.
Notes
- For the most accurate and consistent results, weighing ingredients in grams is strongly recommended, as volume measurements can vary. I highly recommend using a kitchen scale! The cup measurements are close approximations and may not be exact.
- Bread flour or a higher-protein all-purpose flour with approximately 11.5-12.5% protein works well. The dough is soft and sticky, so a stronger flour helps it develop enough strength to hold its shape. I used Costco Organic All-Purpose Flour, which has 11.5% protein. While it is labeled as all-purpose flour, its protein content is relatively high for all-purpose flour and is suitable for this bread. I live in Germany but developed and tested this recipe using US flour, so I haven’t tested it with German flour. If you’re baking outside the US, look for a flour with a similar protein content rather than relying on the name of the flour, since flour classifications and strength can vary considerably between countries.
- The recipe calls for 300 grams total water, but 20 grams is held back during mixing and added gradually as needed. Depending on the flour you use, you may not need all of the reserved water.
- The nutrition information provided is calculated as a courtesy and is only an estimate. I am not a licensed nutritionist or dietitian. For the most accurate nutritional data, consult a professional or use your preferred calculator.
Nutrition
Calories: 126kcal | Carbohydrates: 26g | Protein: 4g | Fat: 1g | Saturated Fat: 0.1g | Polyunsaturated Fat: 0.3g | Monounsaturated Fat: 0.1g | Sodium: 244mg | Potassium: 51mg | Fiber: 1g | Sugar: 2g | Vitamin A: 1IU | Vitamin C: 0.01mg | Calcium: 8mg | Iron: 1mg