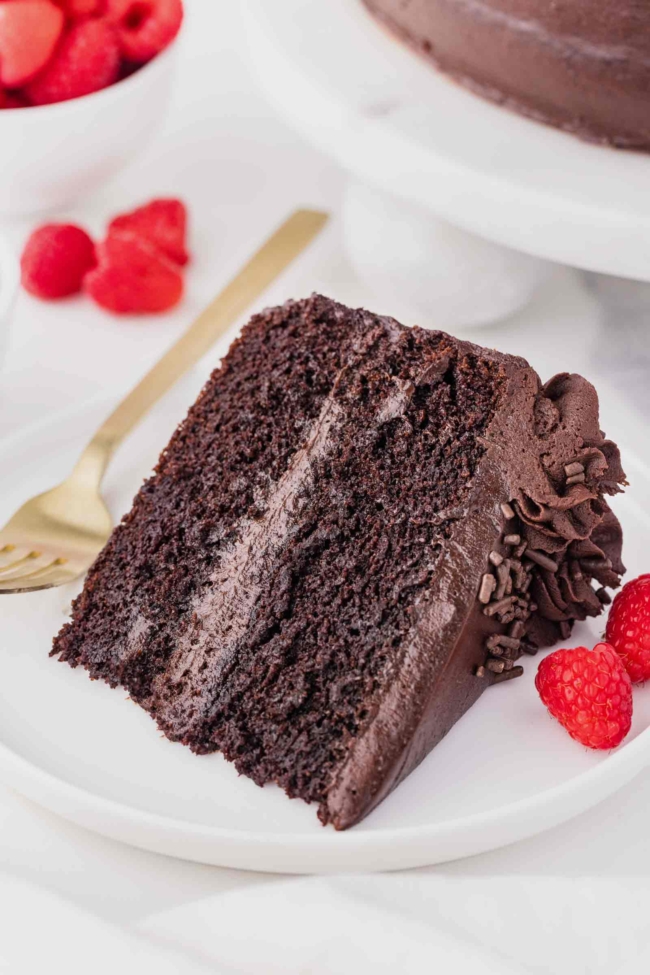
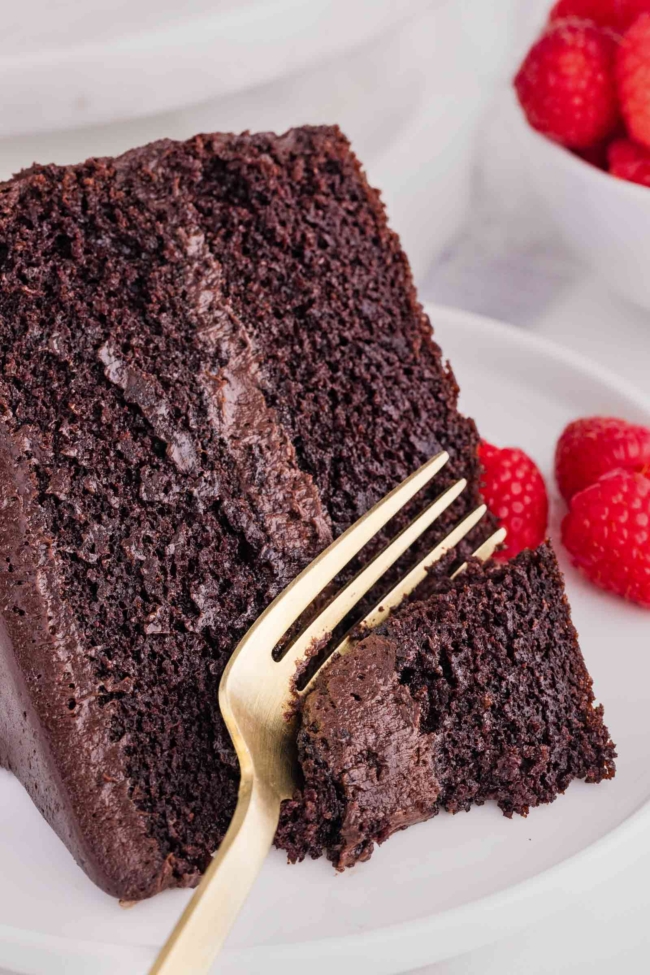
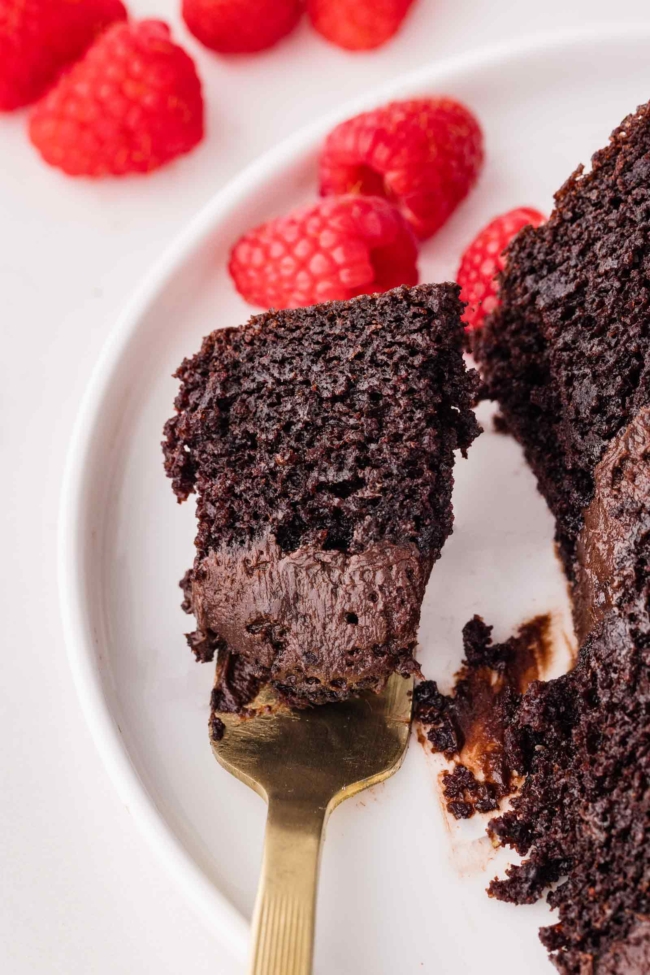
This dark cocoa cake comes together in just one bowl and stays moist for days, so you don’t have to worry about it drying out. It’s my go-to recipe because it’s so reliable, whether you make it with regular flour, whole wheat, or need it to be gluten-free or vegan.
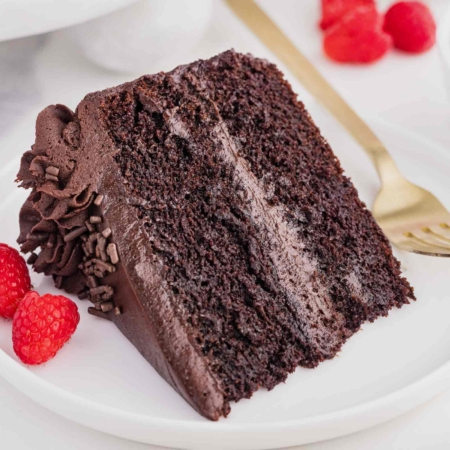
It’s rich enough for birthdays but simple enough for a weeknight chocolate craving. Paired with a creamy, dark cocoa buttercream and a sprinkle of sprinkles or mini chocolate chips, this is a classic layer cake that never disappoints.
I recently said I’d stop posting so many sweets, but I have one more that I need to share! It’s just too good to keep to myself.
I already have this Healthy Chocolate Cake recipe, which is super similar to today’s recipe. It’s lightly adapted from the Hershey’s One Bowl Chocolate Cake. I reduced the water, baking soda and baking powder and the cake is now much, much easier to handle.
No more sticky cake bottoms! And somehow, the cake is just as moist and fluffy.
The healthy version has an avocado-based maple-sweetened frosting. I know a lot of people aren’t into that, so today’s recipe uses a classic chocolate buttercream that’s a little less sweet than your typical buttercream.
It uses about 25% less sugar than a standard recipe as well as dark cocoa powder (aka Dutch-process cocoa powder).
If you prefer chocolate cream cheese frosting, check out my Gluten-free Chocolate Cupcakes (you can use all-purpose or whole wheat in those if you’re not gluten-free). That recipe includes a recipe for chocolate cream cheese frosting. It yields a bit more than 3 3/4 cups, which is plenty for this cake.
What’s To Love
- Deep, smooth chocolate flavor
- Light and fluffy texture
- Easy one-bowl cake batter
- Plenty of frosting for thick layers
- Great for birthdays and celebrations
Ingredient Notes
Please scroll down for the full recipe. This is just a few notes on select ingredients!
- Granulated sugar – if you prefer, you can use coconut sugar.
- Flour – options include all-purpose, whole wheat, white whole wheat, or either of the gluten-free alternatives mentioned below.
- Cocoa powder – since this is a dark cocoa cake, you’ll definitely want to use Dutch-process, which is great in so many chocolaty treats like Brownies with Ganache and Chocolate Coconut Nut Balls. Using regular Hershey’s cocoa powder would result in a lighter shade of brown. Black cocoa powder won’t work well here.
- Eggs – I’ve only tested chia eggs as a sub in this cake, and the result was just as good. While I haven’t confirmed it myself, I suspect other egg replacers that have worked well for you in the past would likely be successful here too.
- Milk – any type of milk works. I used unsweetened cashew milk. If you want to use canned coconut milk, thin it down (about 50/50 with water) and note that it may add some coconut flavor to your cake.
- Oil – any neutral-tasting variety like light olive, canola, vegetable, or grapeseed oil will do the trick. If you prefer coconut oil, I recommend using refined (and melting it first) to avoid any coconut flavor in the final cake. Unrefined oil would leave a noticeable taste.
- Boiling water – although it may seem excessive and result in a pretty thin batter, the full quantity is necessary.
- Butter – ensure it reaches room temperature for easy blending with the sugar. If you’re dairy-free or vegan, use vegan butter.
- Powdered sugar – if it’s clumpy, consider sifting it or blending it in a high-speed mixer to restore its powdery consistency.
Tips for Success
- The batter will look quite thin. That’s exactly what gives the cake its light texture. Don’t panic and add more flour!
- Room temperature eggs mix more evenly and help create a better crumb.
- If your layers are very soft, chill or freeze them briefly before frosting for easier assembly (I’ve never had to do this).
- Do not overbake! Pull the cake when a toothpick shows moist crumbs, not dry crumbs.
Alternative Pan Options
Using a 9″x13″ Pan
Baking times will vary significantly based on your specific combination of sugar, eggs, and flour. For gluten-free or egg-free versions, start checking for doneness at 20 minutes, then every 5 minutes after. For other versions, begin checking at 30 minutes. You may need up to 48 minutes. Bake until a toothpick inserted in the center comes out with moist crumbs but no raw batter.
Cupcake Pans (Two 12-mold pans)
Makes 24 cupcakes. Use liners and bake for 14–18 minutes. My Eyeball Cupcakes for Halloween use a half batch of today’s recipe, in case you want to see how they come out as cupcakes.
Two 9″ Round Pans
This works well, though your layers will be slightly thinner. Because the layers are shallow, they will bake faster than a standard cake. Since this hasn’t been tested specifically, keep a close eye on the oven.
Can I bake the entire batch in one single pan? Only if you are using a 9″x13″ (23 cm x 33 cm) pan or one with a similar surface area of roughly 117 square inches. If you attempt to bake the full batch in a deep, narrow pan (like a 10″ springform), it won’t bake through properly, resulting in a gooey or rubbery texture.
Storage and Freezing
Store the unfrosted layers, covered, at room temperature for up to 2 days or refrigerate for up to 4 days.
Unfrosted layers freeze beautifully. Wrap tightly and freeze for up to 3 months. Thaw for about 20 minutes at room temperature before assembling. If they’re frozen solid, it’ll be difficult to apply the buttercream.
If you want, you can even freeze the whole cake, minus the sprinkles. Place it in the freezer. Once solidly frozen, wrap it with plastic and then place in a large freezer-safe bag for storage.
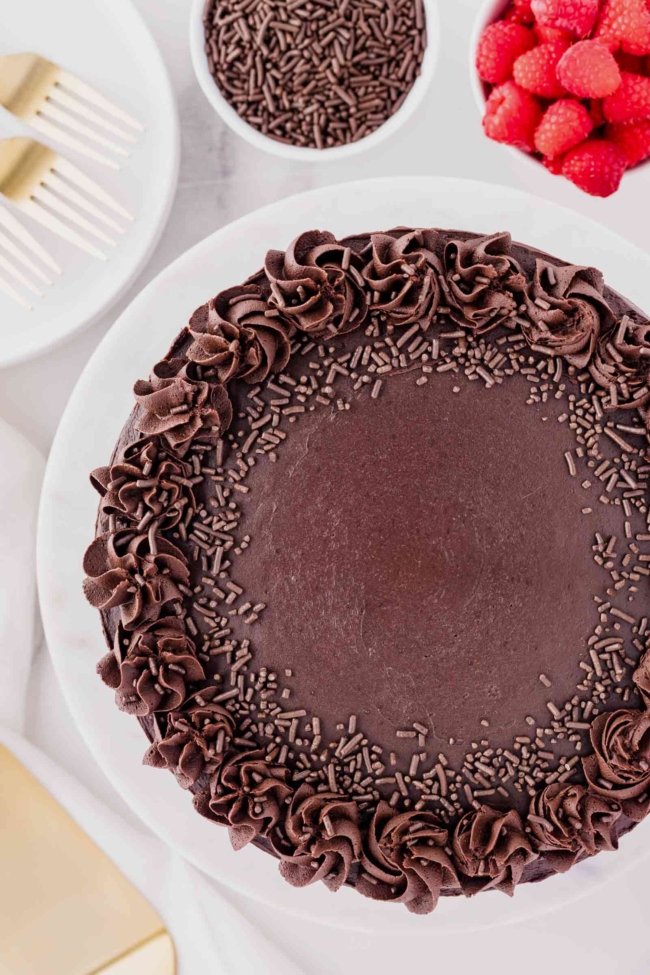
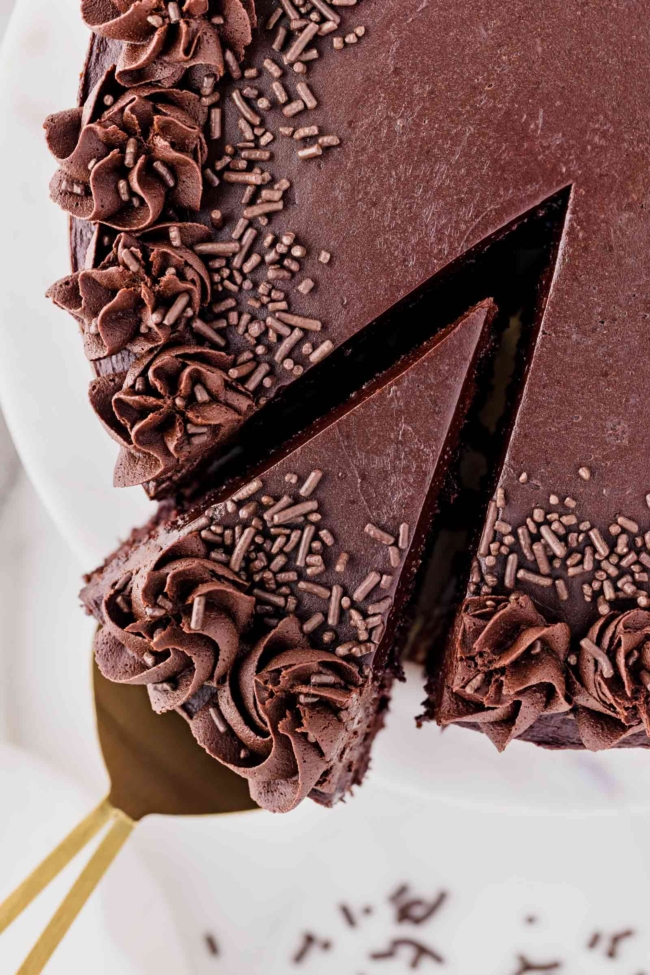
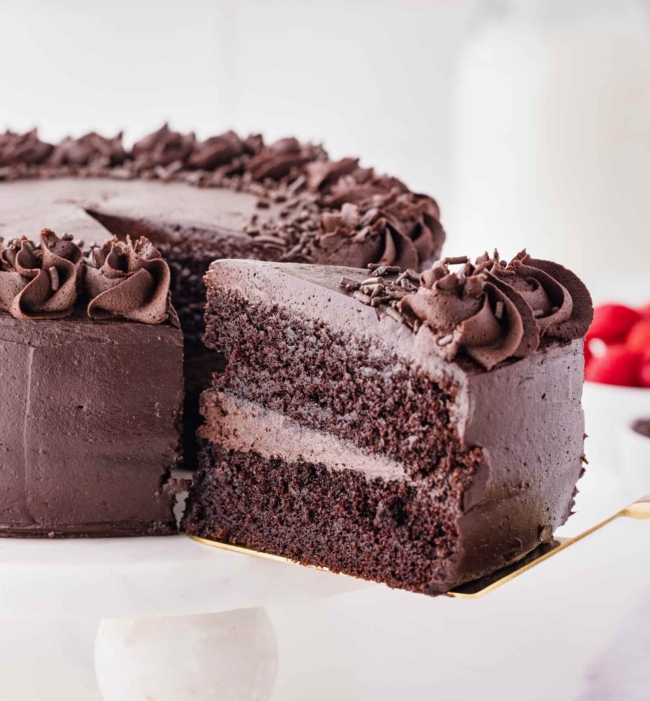
Decoration
My photographer used Wilton Tip 1M and needed an additional 1/4 batch of frosting for the decoration you see. I included the 1.25x recipe for the buttercream in the notes in case you also want to do some piping.
If you use another recipe for piping, you’ll want 3/4 cup + 1 tablespoon of frosting to make sure you have enough.
Gluten-free Version
For the gluten-free version, I used Bob’s Red Mill 1-to-1 Gluten-free Baking Flour and the results were amazing. King Arthur Gluten-free Measure for Measure Flour is also a great option, though it makes the cake slightly more fragile, which is only a concern if you plan on carving the cake into a special shape.
I can’t guarantee that other brands will yield the same perfect texture, and please note that grain-free flours like almond or coconut won’t work here.
Vegan Option
This is the best vegan chocolate cake I’ve had. You just have to use chia eggs in place of regular eggs, plant-based milk (I always use cashew milk, but other types work just as well), and vegan butter in the buttercream.
❤️ Have you tried this dark cocoa cake? ❤️
Please leave a ✍️review and ⭐ rating to let me know how it turned out. I appreciate it so much! 💛
Dark Cocoa Cake
Ingredients
Cake
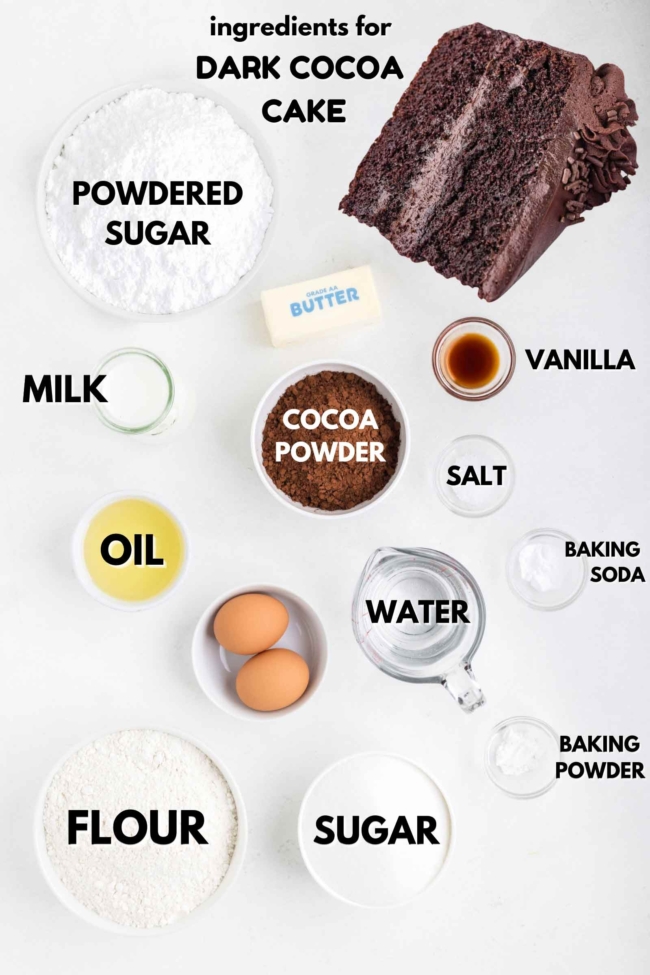
- 2 cups (400 grams) granulated sugar or coconut sugar
- 1 3/4 cups (219 grams) flour see notes
- 3/4 cup (85 grams) Dutch-process cocoa powder
- 1 teaspoon baking powder
- 1 teaspoon baking soda
- 1 teaspoon salt
- 2 large eggs, room temp 50 grams each, out of shell, or 2 chia eggs for vegan (see notes)
- 1 cup (227 grams) milk of choice room temp
- 1/2 cup (100 grams) neutral oil
- 2 teaspoons vanilla extract
- 3/4 cup (170 grams) boiling water not a typo!
Buttercream
- 3 cups (360 grams) powdered sugar
- 3/4 cup (86 grams) Dutch-process cocoa powder
- 1/4 teaspoon salt
- 1 cup (225 grams) unsalted butter softened
- 1 tablespoon vanilla extract
- 1/3 cup (76 grams) milk of choice plus an additional 1-2 tbsp, if needed
Instructions
Make the cake layers
- Preheat to 350 °F (175 °C). Line 2 round 8" cake pans with parchment paper on the bottom and then grease the sides of the pans.
- In a large bowl, stir together the sugar, flour, cocoa, baking powder, baking soda and salt.2 cups (400 grams) granulated sugar1 3/4 cups (219 grams) flour3/4 cup (85 grams) Dutch-process cocoa powder1 teaspoon baking powder1 teaspoon baking soda1 teaspoon salt
- Add eggs, milk, oil and vanilla.2 large eggs, room temp1 cup (227 grams) milk of choice1/2 cup (100 grams) neutral oil2 teaspoons vanilla extract
- Mix for 2 minutes on medium and then stir in the boiling water. The batter will be almost as thin as water.3/4 cup (170 grams) boiling water
- Divide the batter between the two pans. That’s 680 grams per pan (or 692 grams when using Bob’s GF flour).
- Bake for 26-29 minutes or until a toothpick comes out with some moist crumbs, but no uncooked liquid.
- Let cool completely before frosting, about 1 hour. The unfrosted cake layers can remain at room temperature for up to 2 days, or they can be refrigerated for up to 4 days. Alternatively, you can freeze them for up to 3 months.
Make the buttercream
- Whisk together the powdered sugar, cocoa powder, and salt in a medium bowl until the mixture is well combined. Set this aside for later.3 cups (360 grams) powdered sugar3/4 cup (86 grams) Dutch-process cocoa powder1/4 teaspoon salt
- In a separate large bowl, or using a stand mixer with the paddle attachment, beat the butter on medium speed for about 2-3 minutes until it's completely smooth.1 cup (225 grams) unsalted butter
- Lower the mixer speed and add the vanilla extract along with 1/3 cup of milk.1 tablespoon vanilla extract1/3 cup (76 grams) milk of choice
- With the mixer still on low, slowly incorporate the powdered sugar and cocoa mix. Continue mixing until a cohesive frosting begins to form.
- Increase the mixer speed to medium-high. If the texture is too stiff, add more milk a teaspoon at a time until you reach your desired consistency (I used an extra tablespoon). The frosting is ready to use immediately. This recipe yields 3 cups + 3 tablespoons (767 grams), which is plenty for the cake.
Assemble the cake
- If your cakes are very domed on top and you think they'll look bad (I've never had to do this), use a long serrated knife to carefully shave off the domes so each layer is perfectly flat.
- Set your first layer onto a stand or plate and spread an even, smooth layer of buttercream across the top - about 1 cup. Stack the second layer on top, then use an icing spatula or a bench scraper to coat the entire cake.
- Top with mini chocolate chips or chocolate sprinkles.
How to store
- Cover and refrigerate the finished cake for up to 2 days (if you use a non-avocado based frosting, it'll last another 3 days). It also freezes great for up to 3 months.
Notes
- Flour - you can use all-purpose, white whole wheat, whole wheat flour. For a gluten-free version, use 1 3/4 cups (242 grams) Bob’s Red Mill 1-to-1 Gluten-free Baking Flour or 1 3/4 cups (219 grams) King Arthur Flour Gluten-free Measure for Measure Flour.
- To make this cake vegan - use chia eggs in place of regular eggs, plant-based milk, and vegan butter in the buttercream. For the chia eggs, mix together 2 tablespoons of ground chia seed with 6 tablespoons of water until well combined. Let sit for about 1-2 minutes or until goopy like regular eggs.
- To make this cake dairy-free - use dairy-free milk and butter.
- If you want to pipe some frosting on top like in the photos, use Wilton Tip 1M and use these amounts for the buttercream (it's 1.25x the recipe): 3 3/4 cups (450 grams) powdered sugar, 1 cup minus 1 tablespoon (108 grams) Dutch-process cocoa powder, a generous 1/4 teaspoon salt, 1 1/4 cups (281 grams) unsalted butter, softened, 1 tablespoon + 3/4 teaspoon vanilla extract, 1/3 cup + 4 teaspoons milk, plus an additional 1–2 tablespoons if needed.
- The nutrition information provided is calculated as a courtesy and is only an estimate. I am not a licensed nutritionist or dietitian. For the most accurate nutritional data, consult a professional or use your preferred calculator.


Comments & Reviews
Evelyn says
How are there no comments on this?! What the heck. 😂 everyone needs to run to their kitchen and make this! Best cake I’ve had. Hands down.
Erin @ Easy Wholesome says
Haha. Thank you! I appreciate the enthusiasm. 😀 I totally agree with you! Thanks for your comment.