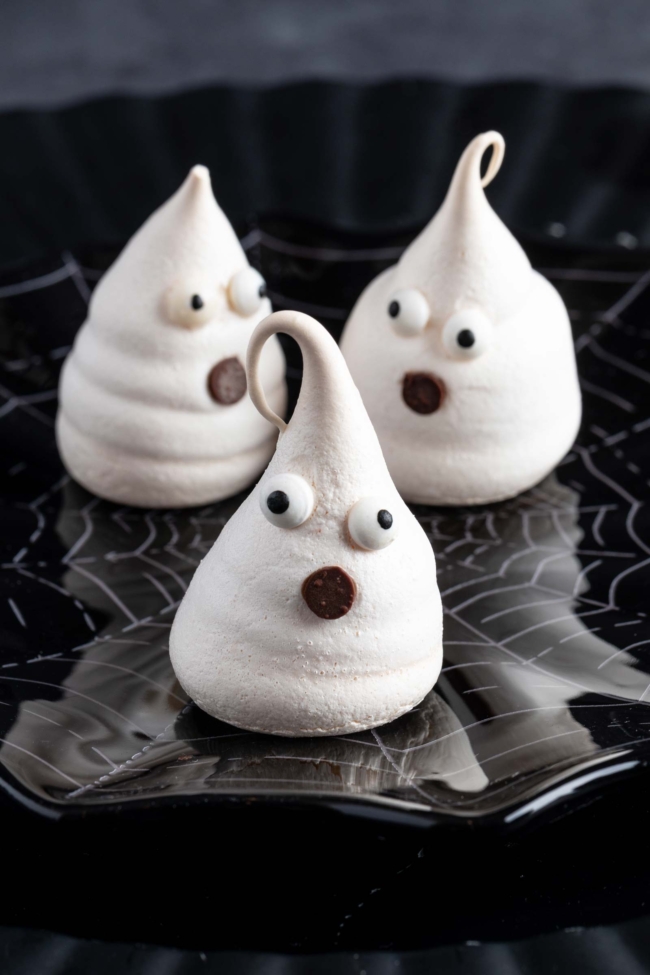
These meringue ghosts only require 5 ingredients and are the perfect addition to your Halloween dessert spread! Light, airy, and irresistibly cute, they bring a delightful mix of sweetness and spookiness to any festive gathering. Whether you’re hosting a party or simply looking to add some ghostly charm to your treats, these naturally gluten-free and dairy-free meringue ghosts are sure to enchant both kids and adults alike.
They’re so cute that I have 3 recipes coming up that use them as decoration. I originally posted this recipe 3 years ago, but I’m posting it again because I realized later on that cream of tartar really does make a big difference.
If you omit it, the meringues crack a bit. So be sure to use that for the prettiest meringues!
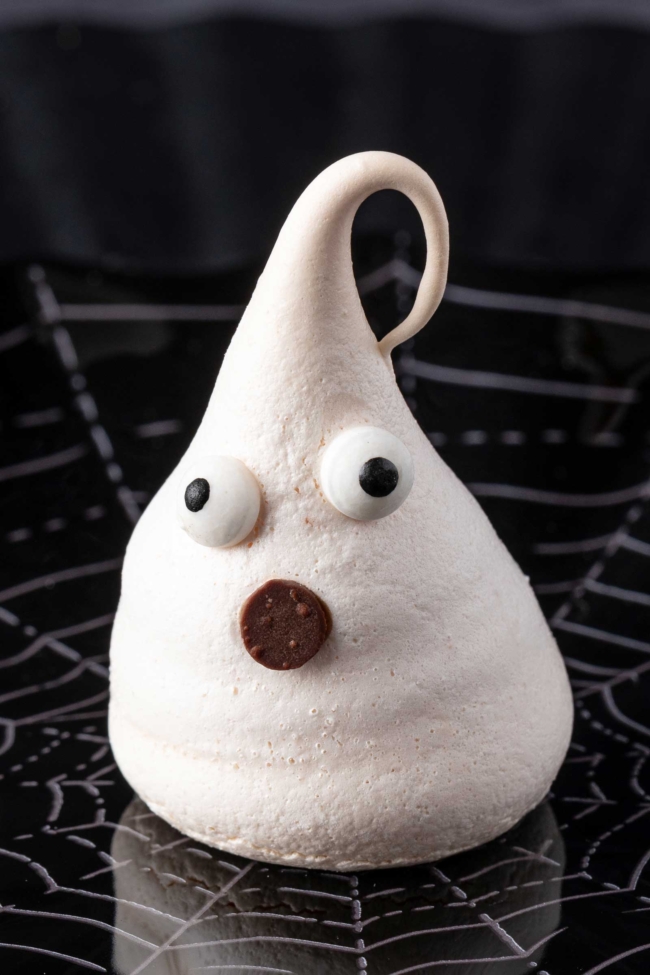
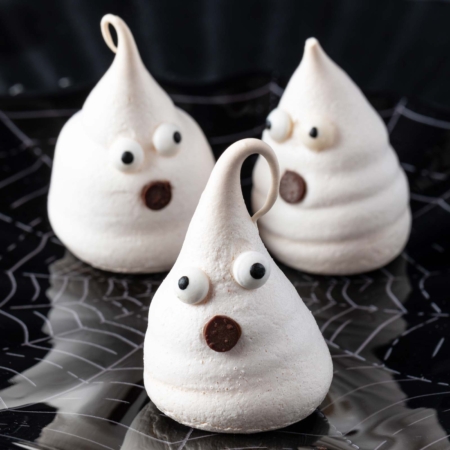
I also made them larger more ghost-like. I also decided to use candy eyeballs for the eyes and mini chocolate chips for the mouths.
If cute isn’t your thing, then you might want to try these chocolate Eyeball Cupcakes along with this Halloween Punch with Eyeballs. The eyeballs are made with canned lychees and blueberries, and the “blood” is made from strawberry jam.
Ghost meringue ingredients
- Egg whites – they develop more air and become lighter if the egg whites are at room temperature. There’s no sub for these.
- Cream of tartar – this stabilizes the egg whites in the meringue, helping them hold their shape and preventing cracks during baking.
- Granulated sugar – Granulated sugar not only sweetens the meringues, but it also helps stabilize the egg whites. It’s essential to this recipe, and I don’t think other sweeteners would work.
- Vanilla extract – you could use a different type of extract if you’d like. While vanilla extract is traditional, you could try almond, peppermint, or even orange extract for a twist. Just *make sure the extract is oil-free,* as oil can deflate the meringue.
- Candy eyeballs and/or mini chocolate chips – or you can use chopped semi-sweet chocolate to melt and paint the faces with a food brush.
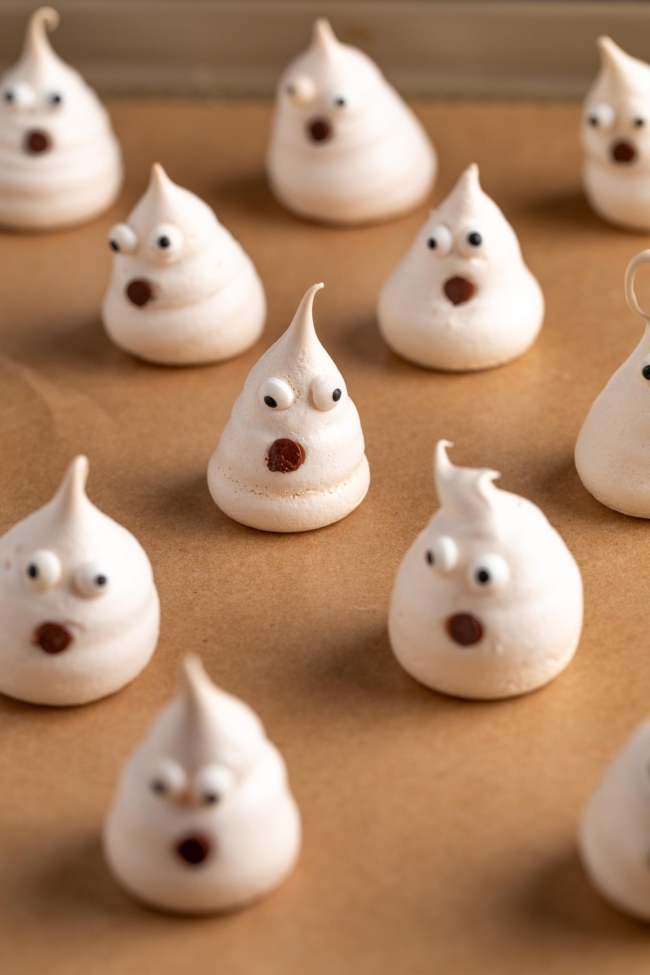
Whether adding candy eyes or using the chocolate chip version, add the faces to each ghost after the meringues have come to room temperature.
How to make them
I give very, very detailed instructions in the recipe box below. But I wanted to show you a few photos of what the process looks like.
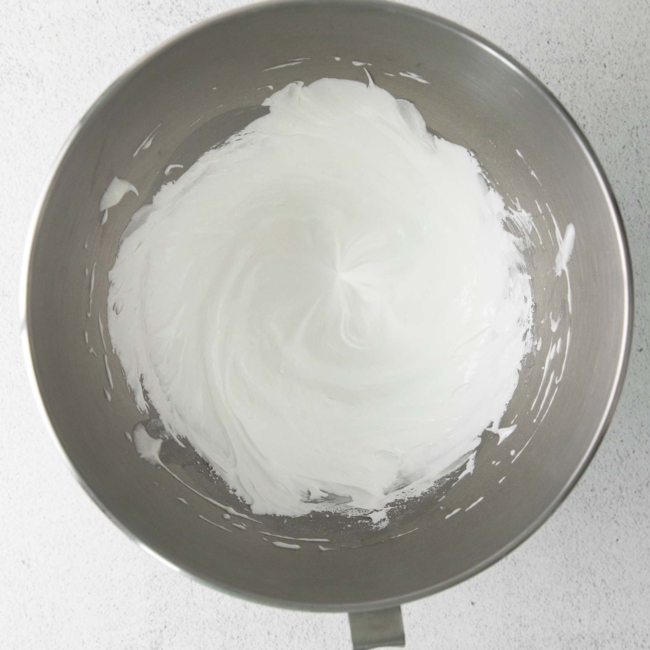
The above is what the meringue looks like once it’s ready.
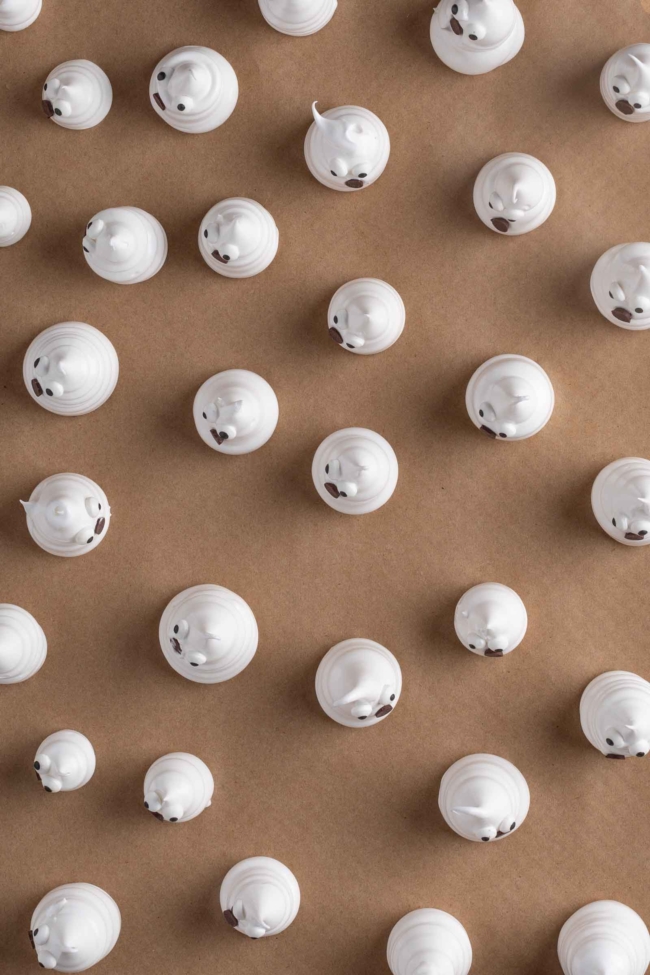
You can pipe them in different sizes as long as they’re not wildly different.

Tips
- Start with a squeaky, clean, and dry metal bowl and utensils. Even the slightest bit of grease residue or the least bit of moisture can turn your meringues into a ghastly sight.
- When separating the egg whites, make sure no yolk is left behind. I find it easier to separate the whites when the egg is fresh out of the fridge. Then, I let the whites sit out for 30 minutes before starting the recipe.
- Egg whites don’t have to be at room temperature, but it is optimal. If you want to make these meringues ASAP and your eggs are refrigerated, put them in a bowl of warm water for a few minutes.
- Don’t dump all the sugar in at once. You’ll have a disaster on your hands. Take your time and add sugar slowly, one teaspoon full at a time, so that the sugar completely dissolves.
- To test it, rub a little between your thumb and forefinger. If it’s gritty, keep beating it until the grit is gone.
- The meringue is done when it holds a stiff peak and isn’t gritty.
- Don’t open the oven door right after you bake the meringues! Just leave them in the oven to cool. You can leave them for 2 to 3 hours or overnight if it’s easier.
Piping meringue
It’s pretty easy to pipe these spooky treats, even if you’re not an expert at piping. The ghost shapes don’t have to be exactly the same, so take a stab, and they’ll be sure to turn out well after the first few attempts.
If you’re terrible at piping like I am, then this Jack Skellington Cake is a fun Halloween party dessert. It looks so neat and fancy, but you really don’t need any skills to do it.
Don’t have a piping bag or piping tip?
These ghost meringue cookies can be piped into any ghostly shape you desire. If you don’t have a piping bag, a simple ziplock will do the trick.
Just fill the bag and squeeze out most of the air, zip it, and cut off a corner of the bag.
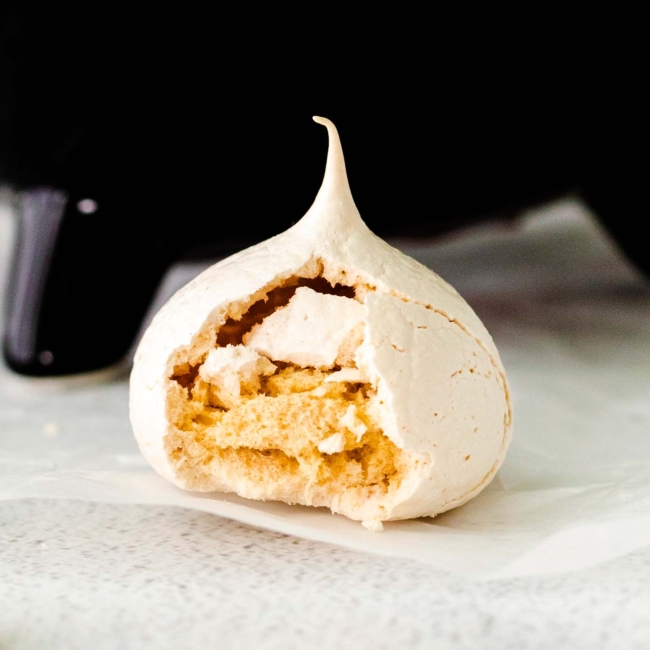
What’s the texture like?
The below photo is from the old set of photos. It doesn’t really give you a good idea of the texture, so I’ll try to explain it.
Meringues have a crisp, light texture on the outside, similar to a delicate cookie, while the inside should be slightly chewy if baked correctly. The outer shell is firm but fragile, and it typically melts in your mouth.
When overbaked, they become completely dry and crunchy throughout. So be careful with them.
The balance between a crisp exterior and a tender, chewy center is what makes meringue cookies so unique.
They’re not incredibly flavorful – that’s just the nature of meringue cookies – but they’re a nice change from the usual. I see them mostly as a fun decoration for Halloween desserts.
If you’re looking for something super flavorful, then these Spider Cookies are my absolute favorite! They’re also super easy and pretty cute.
For something more gory, these Witch Finger Cookies are always a hit!
How to store
These Halloween meringue cookies should be stored in an airtight container at room temperature. They can last up to 2 weeks if kept dry.
Avoid refrigerating them as they can absorb moisture and lose their crisp texture.
Can you freeze meringues?
You can freeze regular meringues, but the faces will get messed up once they start to thaw. So I don’t recommend freezing these ghost meringues.
Humid where you live?
If you live in a humid area, try to make meringues on a dry day. Humidity can prevent the meringue from drying properly and cause them to become sticky.
If it’s humid, you can try leaving them in the oven a bit longer with the door slightly ajar to help them dry out.
How to use meringue ghosts
Try these ghost meringues on cupcakes, hot chocolate (this Instant Pot Hot Chocolate is perfect for parties!), or cake for the ultimate spooky touch!
They can even be placed on a dessert table as cute edible decorations.
Other Halloween party recipes
Looking for more Halloween party ideas? Something fun for the goodie bags is these Halloween Hot Chocolate Bombs.
Frankenstein Cupcakes are also great for the kids, as is this Non-alcoholic Halloween Punch. If you’ve got adults around, then this Vampire’s Kiss Cocktail is my favorite.
If you make these ghost meringues, I’d love to hear your thoughts below in the comments. Thanks!
Meringue Ghosts
Ingredients
- 2 large egg whites
- 1/4 teaspoon cream of tartar
- ½ cup granulated sugar
- ½ teaspoon pure vanilla extract*
- candy eyeballs and/or mini chocolate chips
Instructions
- Preheat the oven to 275F °F (135 °C) and line two baking sheets with parchment paper or Silpats.
- To a metal or glass bowl (I don’t recommend plastic bowls because they can have traces of grease that can be absorbed by the meringue) of a stand mixer fitted with the paddle attachment, add the egg whites and beat at medium-low until the egg whites are frothy. This takes about 30 seconds.
- Add the cream of tartar and continue mixing at medium-low speed until combined.
- Gradually add the granulated sugar a tablespoon at a time. It should take 1-2 minutes to add all of the sugar. Don’t dump all the sugar in at once - it will end in disaster. Take your time and add sugar slowly, one tablespoon at a time, so that the sugar completely dissolves.
- Once all of the sugar has been fully incorporated, turn the mixer to medium speed. Beat the mixture until stiff peaks form and the meringue is shiny, which will take about 3 minutes. To test the meringue, rub a bit between your thumb and forefinger. If it’s gritty, then keep beating until the sugar has dissolved and it no longer feels grainy.
- Mix in the vanilla extract just until combined.
- Transfer the meringue to a large piping bag fitted with a 1/2” tip. It’s easist to add the meringue mixture to the piping bag if you place the bag in a tall glass. Fold the plastic over the edges to make a wide opening and spoon in the meringue. Then fold over the sides and press the mixture towards the tip.
- Place a little meringue on the underside of the parchment paper at each corner of the baking sheet to keep the parchment paper from sliding.
- Begin making ghosts by holding the bag perpendicular to the lined baking sheet. Press gently, using even pressure, and pipe about a 1-inch (2.5-cm) mound (about the size of a Hershey Kiss). Then make some larger ones, about 1.5”, and vary the shapes a bit so they don’t all look exactly the same. Leave at least 2” space between the ghosts.
- Add candy eyes to each ghost and a mini chocolate chip for the mouth (stick in the pointy side; we want to see the smooth side).
- Bake for 1 hour or until they’re dry and crisp. Don’t open the oven door right after you bake the meringues! Turn off the oven and let the meringues cool to room temperature, about 1-2 hours, inside of the oven with the door closed.
- Transfer the ghosts to an airtight container and store them at room temperature. They'll keep for up to 2 weeks if kept dry. Avoid refrigerating them as they can absorb moisture and lose their crisp texture.
Notes
- While vanilla extract is traditional, you could try almond, peppermint, or even orange extract for a twist. Just *make sure the extract is oil-free,* as oil can deflate the meringue.
- If you live in a humid area, try to make meringues on a dry day. Humidity can prevent the meringue from drying properly and cause them to become sticky. If it’s humid, you can try leaving them in the oven a bit longer with the door slightly ajar to help them dry out.


Comments & Reviews
Moop Brown says
These meringues seem so festive and perfect for Halloween. They definitely seem like a treat everyone will enjoy.
Amanda says
These little ghosts are so cute! I’m so ready for Halloween and definitely plan to make a batch this season. Thanks for the festive idea!
Naïby says
How cute are those!! I can’t wait to try making them with my son as a fun activity. Thanks for inspiring me!
Brianna says
These meringues turned out light, airy and crisp! The ghosts are super cute!
Farrukh Aziz says
These look delicious! We love meringues, and adding a halloween touch sounds great! Thanks for sharing, Erin!
Amy Liu Dong says
This is one of my favorite dessert, and I am really excited to make this at home.
Mikayla says
These are adorable and easily popped in your mouth for a quick tasty treat. I chose to use homemade bourbon vanilla, delicious!
Megan Ellam says
How cute are these little ghosts! Thanks for the inspiration I have bookmarked for Halloween.
LaKita says
These sweet little ghost meringues are so deliciously cute and festive, absolutely perfect for Halloween.
Allyssa says
This is so cute and super easy to make! Tasted amazing as well! Thanks a lot for sharing this recipe, will have it again! Well done!
Petro says
Aww, these are too adorable, not sure I could eat them! Love the presentation too!
Autumn Brooke says
What a cute and innovative way to use meringues! And that mug is perfection.