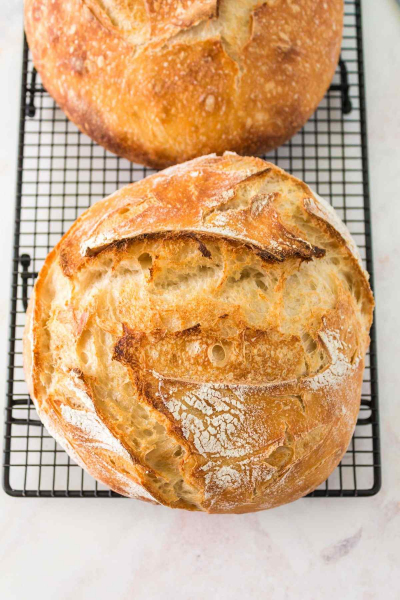
Baking overnight sourdough bread is a satisfying process that is fun and easy to do. With this simple recipe, you’ll start the process before you sleep and when you wake, you’ll be ready to bake and start your morning with a delicious sourdough bread that has a perfectly crisp crust and hearty tangy flavor. It’s naturally vegan and hands down one of the best-handcrafted loaves of bread you can make at home.
Whether it’s your first time baking bread or you’re an accomplished bread maker, a loaf of good overnight sourdough bread is every baker’s dream. Thankfully, this recipe is easy even for beginners to tackle with confidence and the result will be a wonderful tangy loaf of sourdough bread that will look like a rustic artisan loaf.
What is sourdough bread?
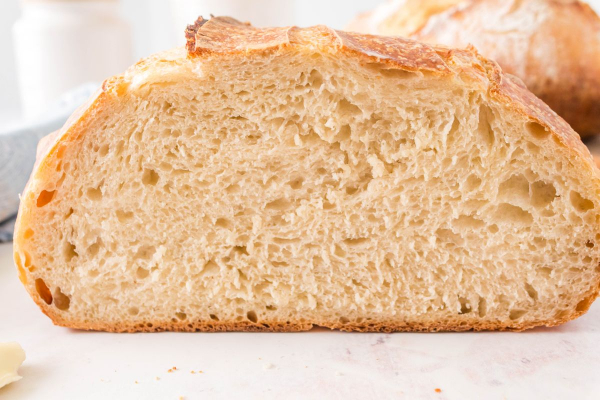
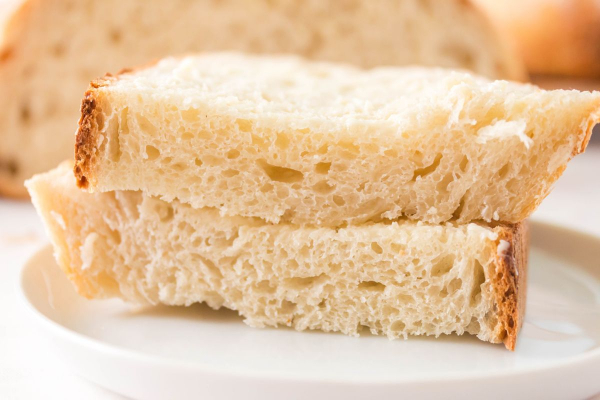
Sourdough bread is simply a slow-fermented bread that doesn’t require commercial yeast to rise. It’s easier to digest and more nutritious than regular bread. This is because it’s unique because it is made with a live fermented culture, a sourdough starter. This wild yeast acts as a natural leavening agent.
Sourdough bread is known for its tangy flavor, crisp crust, and chewy texture. It is better tolerated, and its naturally occurring acids and long fermentation process helps break down the gluten, making it easier to digest and absorb nutrients like folate, calcium, potassium, and magnesium.
That is NOT to say that it is gluten-free (I speak more on this below).
Sourdough is an excellent source of antioxidants which helps to lower the risk of certain types of cancer, signs of aging and aids in some chronic diseases like arthritis.
With all this natural goodness and amazing profile, making sourdough bread from scratch is a satisfying process that will leave you wanting to do it again and again.
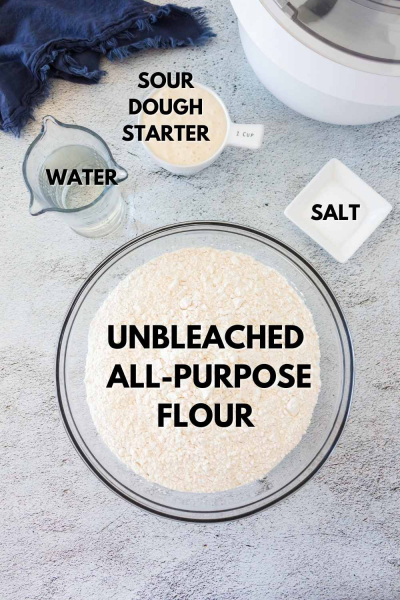
Basic ingredients
With just four ingredients and a little effort, you’ll get a fantastic loaf of bread to start your morning.
- 1 cup sourdough starter
- 3 1/4 cups room temperature bottled water, divided*
- 8 cups unbleached all-purpose flour
- 5 teaspoons salt
About the water – it’s been said that chlorinated water inhibits the growth of the sourdough starter, so you can either boil tap water and let it cool before adding it to the ingredients or use bottled water.
And if you’re looking for more ways to use some of your sourdough starter, try these great-looking Sourdough Pretzel Bites!
Why unbleached flour?
Unbleached flour is naturally aged and makes a denser and tougher texture than bleached flour, so it is best used for sturdy desserts and bread. Because it is naturally aged doesn’t mean it hasn’t been treated with chemicals, but unbleached flour usually has fewer chemicals than bleached flour.
One chemical you might find in unbleached flour is potassium bromate. It is typically used in unbleached flour in the U.S. as a flour improver to strengthen the dough and allow higher rising. It’s been banned by European Union, Canada, China, and many other countries due to its carcinogenic properties. Although it is debatable if these small amounts of added oxidizers are a significant health risk, in the long run, I recommend reading the labels to find unbleached flour without all the chemicals.
Bleached flour has been aged chemically to speed up the process, making it whiter, finer, and softer. This process causes the flour to lose nutrients like protein and calcium and it changes the taste, texture, and appearance. It’s a softer flour and best suited for cookies and cakes.
Benzoyl peroxide is the most common agent used as an oxidizer in bleached flour, which strengthens the dough and intensifies the elasticity, making it more uniform and whiter. This agent can be found in acne cream.
So, if you can find unbleached flour without any chemicals added, you’ve just added to the nutritional value and improved the bread overall.
Why Overnight Sourdough?
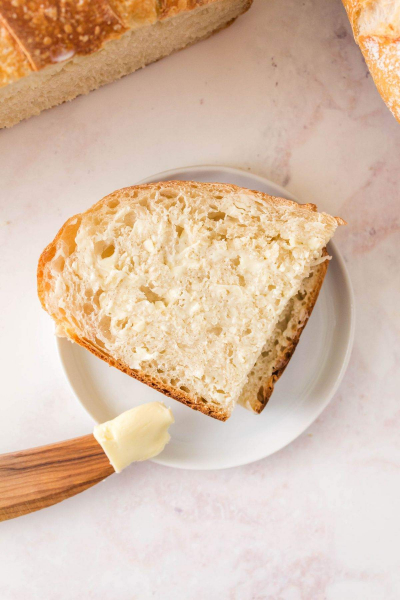
Nothing says let’s start this day off right, like fresh, warm toasty sourdough bread in the morning. The magic of this sourdough happens while you sleep, so when you wake up, you only need to bake it and enjoy a wonderful slice of bread with your favorite spread, like this Blueberry Chia Jam.
Overnight sourdough does take effort, but nothing competes with its classic taste, robust crunch, and healthy chewy goodness. And for another overnight sourdough recipe, check out these Sourdough Bagels.
What is the stretch-and-fold technique?
The stretch-and-fold technique improves the quality of sourdough bread by strengthening gluten and gently trapping air into the dough without kneading and helps equalize the temperature of the dough. The purpose is to increase the volume and to get a high rise.
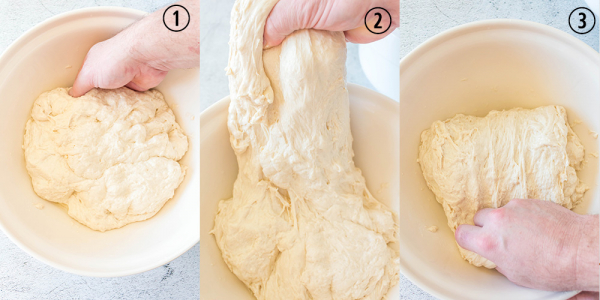
To start, put the bowl in front of you and picture the dough as if it were a clock ⏰ with 12 being in front of you.
With slightly wet fingertips, grab a handful of the dough with fingers under the ball and the thumb on top, and at 12, pull/stretch upwards.
Fold the dough back on top over the center of the bowl, like closing a book.
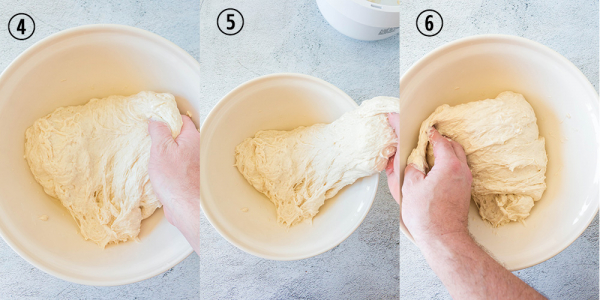
Do it again at 3, 6, and 9 o’clock.
Cover the dough and let it rest for 30 minutes in a warm, draft-free spot (a microwave works great).
For this recipe, you will repeat the stretch and fold technique a total of 4 times for a total resting time of 2 hours.
It’s a simple technique and always fun to get your hands in the dough!
How to score bread
There are two basic reasons for scoring bread. When making bread there are three rises. The first rise, the second rise is called proving which comes after knocking the air out of the dough, and the final rise is called the oven spring which happens in the oven.
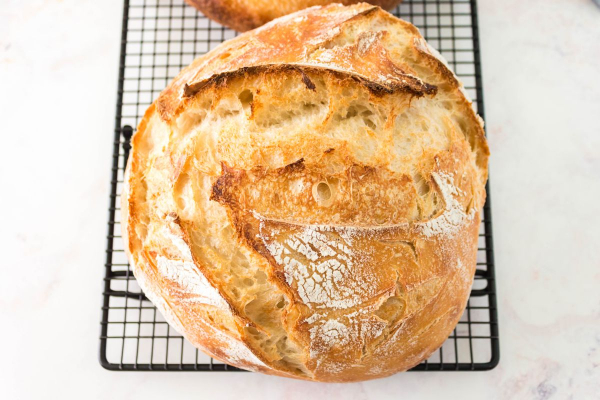
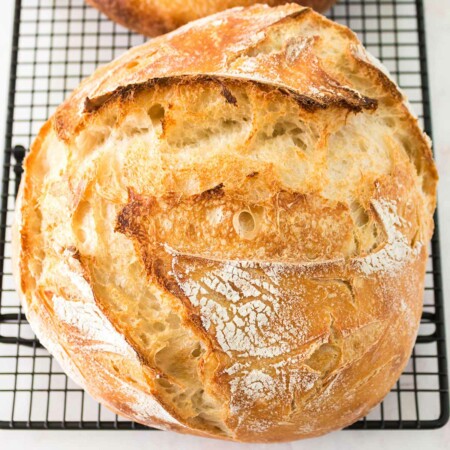
The intense heat of the oven will cause the yeast to go into hyperdrive and will overproduce resulting in a significant rise of the dough like a volcano effect that leaves lumps and bumps. Scoring bread before it goes into the oven allows this oven spring to be more controlled and less explosive.
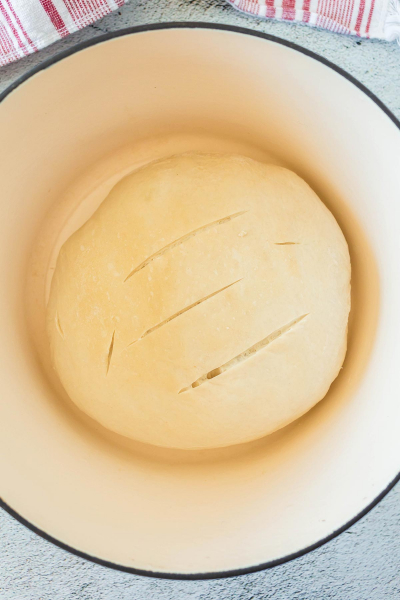
Scoring loaves also gives the bread an aesthetic appeal. Back in the day of communal ovens, bakers would have their own scoring “signature” pattern to identify their loaves.
The key to scoring is to move the blade along a single, deliberate line. The skin of the dough should slightly cut open and move apart.
It’s up to you how fancy you want to get. You can do a single line down the middle or make x’s, hashtags, and spirals, or even intricate leaf or lace designs on the top of the loaf.
So here is your chance to create your own signature score that matches your artistic expression.
What to do with your sourdough bread
If you are looking for ideas on what to do with your sourdough bread, I have something for everyone.
Mozzarella Bruschetta – imagine ripened sweet tomatoes, fresh basil, and lots of mozzarella topped on your amazing slice of sourdough bread for this easy appetizer.
This Beer Cheese Dip would also be great alongside this bread!
Smoked Corned Beef Brisket – if you try this smoked corned beef brisket then adding sourdough bread to the menu will leave you with an incredible sandwich for your next leisurely lunch.
Air Fryer Ham – since you’re using the oven for the sourdough then why not use the air fryer for this delicious ham recipe. It’s easy and all you do is add butter, garlic and herbs to a fully baked ham and heat it up. With the leftovers, you can have a tasty ham sandwich later in the week.
How to store sourdough
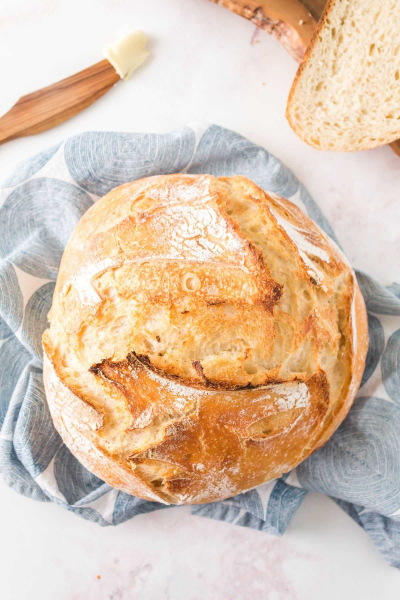
If the bread has just come out of the oven, it is best to leave it out uncovered at room temperature for the first day. The crust will remain at its best texture for at least one day, but not two.
It’s important not to slice your bread before it has thoroughly cooled because it will dry out quicker and it will affect the texture and flavor making it gummier and less light and airy. Resist the urge!
Once the bread has cooled, you can slice the bread but it’s best to leave the cut-side down on the cutting board, uncovered. This helps retain moisture and leaves the crust crisp.
If you don’t like the crunchy crust you can wrap the bread in a clean towel while it is still warm and the crust should be softer.
If you plan to store the bread and have not sliced into it, you can transfer it to a large paper bag and fold the edges. The bag will allow the air to circulate and helps retain moisture, but you will notice the crust will not be as crispy.
Usually, by day three, you will want to store the bread in a bread box or in a large Ziploc bag. It can cause the moisture to be trapped resulting in a softer crust but you can toast the bread lightly to get that crispy crunch back.
If you haven’t eaten the entire loaf after a few days, I suggest storing it in the freezer.
Can it be frozen?
It sure can! So if you’re baking one loaf of sourdough bread, you might as well make two and freeze a loaf for later. 😉
When freezing homemade bread, it is extremely important to allow it to cool completely before freezing it. It can last from 3 to 6 months, but note the longer it’s stored, the more the flavor will be diminished.
To freeze an entire loaf of bread, allow it to cool completely, then transfer to a large Ziploc bag and press out excess air and seal. It’s a great way to store your extra loaf and it will taste just as amazing as the day you first baked it.
If you don’t want to freeze an entire loaf, you can easily freeze the bread after slicing it, just add the slices to a large Ziploc bag. If the bread is extremely moist, you may want to add a small piece of parchment paper between each slice to ensure the slices don’t freeze together.
This allows you to take out one slice at a time, just defrost, toast it and serve up a delicious breakfast or snack.
Also, for another great sourdough recipe, try this Potato Sourdough Bread!
Can this be made gluten-free?
Unfortunately not. You need to find an already gluten-free recipe to make sure that it works. Converting a non-gluten-free bread recipe to gluten-free is hugely risky and usually a waste of time and ingredients.
It’s sometimes doable for quick bread, but a big fat nope to yeasted bread and sourdough.
I am working on one, though!
So that’s it! Enjoy. 🙂 If you make this or any of my recipes, I’d love to see pictures of your creations on Instagram, Facebook and Twitter! Hashtag them #fooddoodlesrecipes so I can check them out.
Overnight Sourdough Bread
Ingredients
- 1 cup sourdough starter
- 3 ¼ cups room temperature water divided
- 8 cups of unbleached all-purpose flour
- 5 teaspoon salt
Instructions
- To the bowl of a stand mixer add 1 cup of your sourdough starter and 3 cups of room temperature water and mix until milky looking.
- Mix in the flour until combined. Let the dough rest for 30 minutes.
- Add the salt and 1/4 cup of the remaining water. Mix the dough until everything is combined and the dough comes off the side of the bowl. The dough will still be quite sticky and wet. Transfer the dough to an oiled bowl.
- Now it's time to stretch the dough. With the bowl in front of you, picture the dough as if it were a clock with 12 being in front of you. Grab a handful of the dough (fingers under the ball and thumb on top) at 12, pull/stretch the dough then fold it back on top, like closing a book. Do it again for 3, 6 and 9 o’clock.
- Cover the dough and let it rest for 30 minutes in a warm, draft-free spot. The microwave is a good place.
- Repeat steps 4 and 5 three more times. For a total resting time of 2 hours.
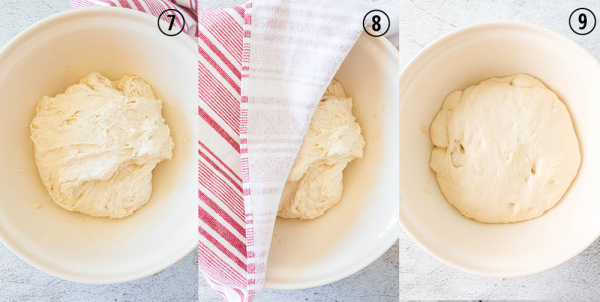
- After doing the stretch and fold technique 4 times (every 30 minutes for 2 hours), cover the dough with a clean tea towel. Let it rest in an undisturbed, warm, draft-free place for 2 hours or until doubled in size.
- Slightly flour a clean countertop and put the dough on there. Cut the dough in half and shape each half into a large ball. Let it sit uncovered on the counter for 30 minutes.
- Get our two proofing baskets, plastic or glass bowls. Flour them with a bit of flour or put a piece of parchment paper in there and put the bread on that. This will make transferring the dough to the Dutch oven easier tomorrow morning.
- After the 30 minutes are up, do the stretch-and-fold technique one last time and transfer the dough to the prepared bowls.
- Cover and put in the fridge overnight.
The next morning:
- Get your bread out of the fridge.
- Put a Dutch oven in the oven and preheat the oven, with the Dutch oven in there, to 425 °F (218 °C). I use a 7-quart Tramontina Enameled Cast Iron Round Dutch Oven.
- Once the oven is preheated, take the Dutch oven out of the oven and put the bread in. If you used a proofing basket, gently tilt the basket and the bread will fall out into the Dutch oven. Or you can transfer the dough into your hand, gently, so that you don’t squish the air bubbles and put the dough in the Dutch oven. You could also use parchment paper - lift the dough by holding the parchment paper edges and put in the Dutch oven with the paper.
- Score your bread with a sharp knife or a blade. Make 2 or 3 scores on top
- Bake, with the lid on, for 20 minutes.
- Take the lid off and cook for another 15 to 20 minutes.
- Remove the Dutch oven from the oven, and remove the bread from the Dutch oven. Transfer it to a cooling rack for 15 minutes before slicing.
- Put the lid back on the Dutch oven and put it back in the oven to re-heat for 5 minutes. Then repeat steps 3 to 7 for the second bread.


Comments & Reviews
Cathy says
Oh I will DEFINITELY be making this! It looks absolutely perfect!
Farrukh Aziz says
This is the best sourdough recipe ever! It was a great pair to jam, and my favorite avocado toast! Looking forward to making this again!
Allyssa says
Super thank you for this very easy and helpful bread recipe! the fam loves it and I will make it again!
Catalina says
Love the texture of this bread. And with your step by step recipe seems so easy to make.
Tara Teaspoon says
This recipe for sourdough bread is perfect for dips once it comes out of the oven!
Beth says
I made two loafs the other day and we made sandwiches, and I froze the other one. Such a great and delicious recipe! I will be making this again!
Allyson Reed Zea says
Oh this looks soooo good! I love me some crusty bread!
Kevin says
Nothing beats homemade bread! This one is calling my name! Cannot wait to make it!
Erin | Dinners,Dishes and Dessert says
This sourdough bread looks incredibly delicious!
Jen says
As a complete novice baker, I want to thank you so much for explaining the how’s and why’s to this recipe. I never knew why you were supposed to score bread. My neighbor has a starter that she’s been offering me for the last week so it looks like I can actually take her up on it now. Thanks!
Charlotte Moore says
This is a great looking bread. I have never made sourdough bread but one time. It was not a pretty site. Haha!! Not even edible. It has been years so not sure of the recipe.
Susie says
I’m not a bread maker but after reading this very informative article about Sourdough Bread, I’m really tempted to try my hand. I do enjoy good sourdough bread!!