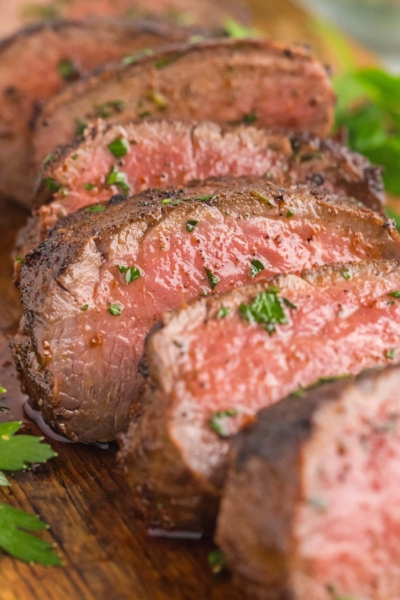
This venison backstrap recipe is perfect for a special occasion. It’s incredibly tender and flavorful, with a simple seasoning rub and a good sear. The garlic butter sauce is the perfect finishing touch. It’s also keto-friendly.
Backstrap is a term used when referring to wild game like deer, elk and moose and refers to the meat along the animal’s spine. Today, I’m sharing a recipe for blackstrap venison, which is lean and low in saturated fat, making it healthier than other meat choices.
If your family hunts, you’re probably familiar with how versatile venison is. There are different ways to prepare it, and one of my favorites is this hearty and flavorful Venison Chili. It’s a great way to use leftover venison and an excellent dish for a crowd; same with this Hamburger Helper from Scratch. It’s made with ground venison and is one of my most popular recipes.
Because you only get two backstraps per deer, it’s important to make the most of it and not to overcook it.
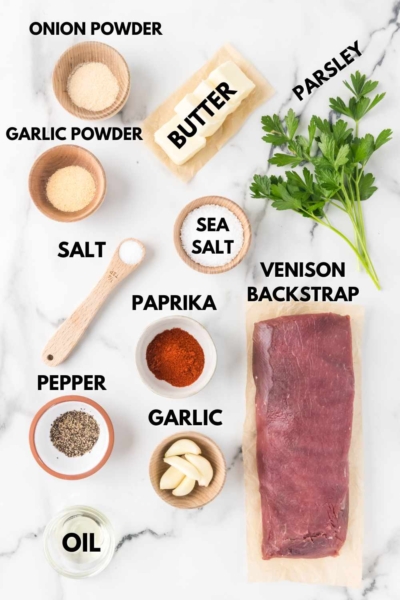
Ingredients
Here’s what you’ll need.
What is venison backstrap?
The backstrap is often compared to filet mignon, and it’s about the length of a loin. There’s little to no marbling, so it’s essential to cook it carefully and avoid overcooking and drying it out.
The best way to cook venison backstrap is to sear it on all sides, then cook it to medium-rare or medium doneness.
It can be cooked in various ways, including grilling, pan-frying or baking.
In this recipe, you’re going to sear it to get a nice crust, bake it to cook to temperature and garnish it with a garlic butter sauce.
How to make it
The full recipe is below, but you can kind of get an idea here.
Make sure to use an oven-safe skillet as you’ll be placing it in the oven!
Backstrap vs. tenderloin
Backstrap and tenderloin are often thought to be the same, but they’re quite different.
The backstrap is a larger muscle that is tender and only slightly gamey and runs along the spine of the deer. It melts in your mouth and is a must-try for anyone who enjoys wild game meats.
True tenderloins are also tender and are found in the deer’s abdominal cavity. They’re much smaller than backstrap, and because they’re located beneath the spine, they’re harder to reach.
Is it gamey?
Venison is often labeled “gamey” tasting, but the backstrap isn’t as pronounced as other cuts of meat. Also, a gamey flavor is more noticeable in older deer, so if you’re new to venison, it’s best to start with a backstrap from a younger animal. This will allow you to experience the true flavor of venison without being overwhelmed by a strong, gamey flavor.
It has a rich, earthy flavor with a slightly sweeter and more delicate taste than beef.
What temperature do you cook venison backstrap?
The temperature to cook venison is as essential as any spice or marinade you may use to season it. The backstrap should be cooked medium-rare to medium, and if you like your meat more well done than that, I recommend finding a recipe with a different type of meat.
Deer should never be cooked past medium as it doesn’t have a lot of fat, and overcooking it will leave it dry and tough. Honestly, it should only be cooked to medium-rare.
For this cut of meat, I suggest bringing the temperature to 120 °F (49 °C) – 130 °F (55 °C) and taking it out of the oven to rest for 5 to 15 minutes until it comes to 130 °F (55 °C) to 135 °F (57 °C).
Remember that the meat will continue to cook as it rests and will come to temperature in that time.
Resting the meat allows the juices to be reabsorbed into the meat as it comes to temperature, so don’t slice the meat until it has fully rested.
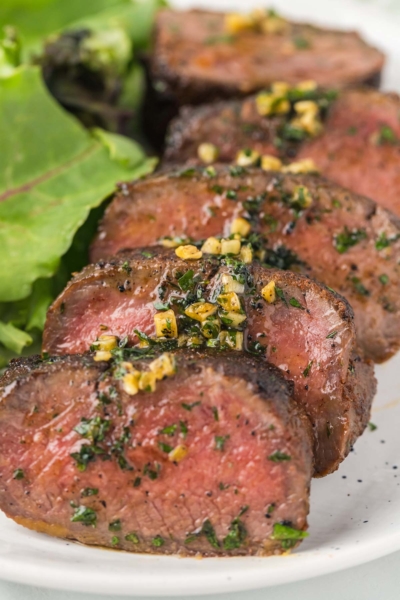
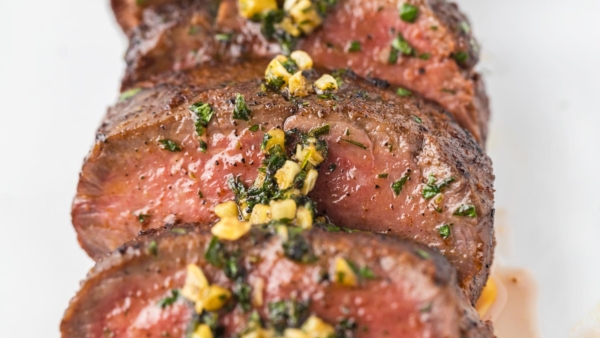
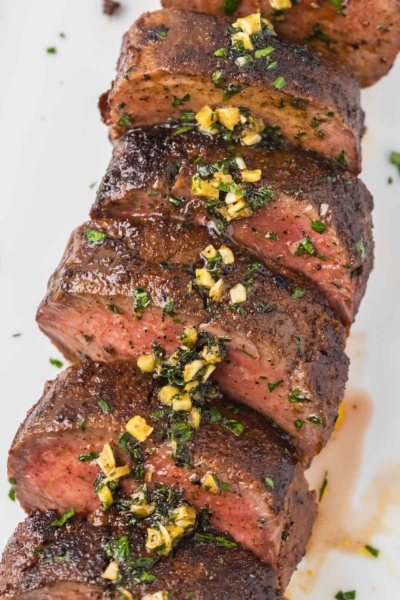
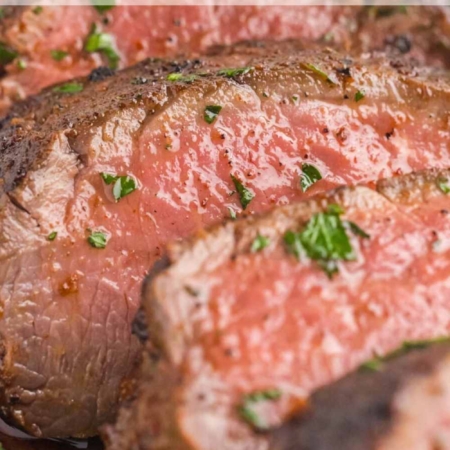
It will have a pinkish-red center even at 130 °F (55 °C).
If you’ve ever had tough venison that was gray in color and extremely gamey tasting, it was overcooked.
Tips
- If you’re using frozen venison, make sure the backstrap is fully thawed. Place it in the refrigerator to thaw overnight. Then place it on the counter for 1 hour before cooking.
- If the backstrap has a silver skin, remove it before cooking. This helps the meat cook evenly and prevents it from curling.
- Keep the backstrap as one piece of meat; don’t cut it into chunks or slices before cooking it.
- Add oil with a high-smoke point to the pan to get a good sear. This keeps it from sticking to the pan.
- Sear the backstrap in a hot skillet on all sides until it’s browned.
- If you try turning the meat and it isn’t coming off the pan easily, it’s not ready to be turned.
- A meat thermometer ensures the backstrap is cooked through. If you overcook it, it will be tough and dry.
- Let the backstrap rest before slicing and serving.
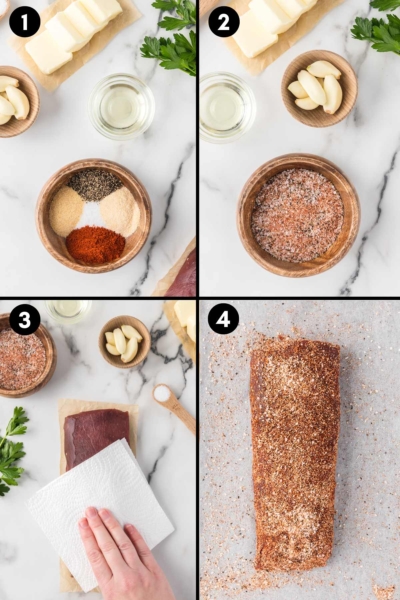
The rub
This recipe calls for a simple spice rub made of sea salt, medium-coarse black pepper, paprika, garlic powder and onion powder. This Prime Rib Rub uses rosemary and thyme should you like something more herby!
The seasoning spice rub adds flavor and creates a crust that adds texture.
Apply the rub liberally. You want to make sure the rub covers all of the meat’s surfaces.
Give the rub time to set before cooking, allowing it to penetrate the food and add flavor.
At a minimum, you should rub on the seasoning 40 minutes before searing or you can refrigerate it uncovered for up to 24 hours. If you refrigerate it, let it sit at room temperature for 1 hour before cooking.
If you don’t have 40 minutes, season it immediately before cooking; otherwise, the juices will be lost, making it difficult to sear.
The oil
Using oil helps the meat not stick to the skillet’s surface when getting a good sear. It also enhances the flavor and helps the meat retain moisture, which is necessary as a backstrap is a lean cut of meat and can dry out easily.
I use canola oil for this recipe because it has a high smoke point, meaning it can withstand high temperatures without breaking down.
If you don’t have canola oil, choosing an oil with a high smoke point is essential. Avocado oil is a good choice for high-heat, as well as peanut oil, grape seed oil and sunflower oil.
Oven-safe pan
I use a cast iron skillet large enough for the backstrap that can be placed in the oven. It’s important to use an oven-safe skillet, not one that has a wooden handle, making it unsafe for the oven.
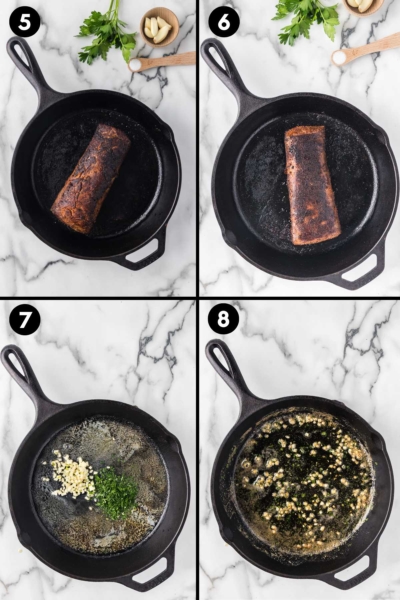
How to deglaze
Once the backstrap is resting on a plate, it’s time to deglaze the pan’s surface to make use of all the juices and bits stuck to the bottom to make a tasty sauce.
I use a wooden spatula, but you can use whatever makes sense for your pan.
Put the pan with the drippings back on the stove at medium-low heat and add the garlic butter ingredients. Use a spatula to scrape the bits stuck on the bottom of the pan to deglaze it.
You’ll cook the garlic until it’s soft, for about 1 to 3 minutes.
Garlic butter
The backstrap needs a little fat to help balance the leanness of the meat and enhance its flavor, so you deglaze the pan with the garlic butter ingredients to serve on top of the backstrap.
What to serve with venison
Venison pairs well with mushrooms, asparagus or any roasted veggies you like. It’s also great with something lighter on the side, like this Green Apple Salad.
My son loves it with boiled broccoli, and here’s how long to boil broccoli so that you don’t end up with nasty mush.
I like Red Skinned Mashed Potatoes, and this Sunflower Seed Salad with Cranberries adds a little color to the table.
This Green Beans Recipe is also a super quick and easy recipe that’d go great with this backstrap.
More flavorful main dishes
- Smoked Ribeye Recipe
- Chicken Leg Quarters Recipe
- Smoked Corned Beef Brisket
- Air Fryer Pork Tenderloin
I hope you’ll like this venison backstrap as much as I do! If you try it, I’d love to hear from you. Just leave a comment below and tell me what you think. Thanks!
Venison Backstrap Recipe
Ingredients
Meat:
- 1 venison backstrap (about 1.5 to 2 pounds or 680-907 grams)
- 1 tablespoon canola oil
Dry rub:
- 4 teaspoons sea salt
- 1 teaspoon medium-coarse black pepper
- 2 teaspoons paprika
- 1 teaspoon garlic powder
- 1 teaspoon onion powder
Garlic butter:
- 5 garlic cloves 20 grams, peeled, minced
- 1/4 cup unsalted butter
- 1 1/2 tablespoons fresh parsley from about three 6” sprigs
- 1/4 teaspoon salt
Garnish:
- fresh parsley
Instructions
- Mix together all dry rub ingredients in a small bowl.
- Use paper towels to pat the backstrap dry.
- Rub the dry rub over all sides (you can do this 40 minutes or up to 24 hours in advance - refrigerate it uncovered). If you can’t rub on the seasoning at least 40 minutes before cooking, put it on immediately before cooking. Otherwise, juices will be lost, making it more difficult to sear the meat properly. If you refrigerate it, remember to let it sit at room temp for 1 hour before cooking.
- Preheat the oven to 375 °F (190 °C).
- Before cooking, use paper towels to again pat the meat dry. The drier the meat, the better the crust you’ll get while searing.
- Get out a cast iron skillet that's large enough for the backstrap and can also be placed in the oven.
- Heat it over high heat until piping hot.
- Add the oil, swirl it around, and when it starts to shimmer, add the meat to the pan.
- Sear the backstrap over medium-high or high. All stoves are different - if you’re on high and it’s burning, turn it to medium-high. Once there's a crust, usually after about 2-3 minutes, flip and continue searing all sides of the meat. If you try to turn it and the meat isn’t easily coming off of the pan, that means it’s not ready.
- Place the skillet with the meat in the oven and cook for 5-10 minutes. It should only be cooked to 120-130 °F (49-54 °C) and will rise in temperature to about 130-135 °F (54-57 °C) - this is medium-rare - as it rests out of the oven. It's very important not to overcook it as it'll turn tough.
- Remove the pan from the oven and remove the meat to a plate. Let the meat rest for about 5-15 minutes or until it reaches 130-135 °F (54-57 °C).
- Meanwhile, put the pan (with the pan drippings) back on the stove at medium-low heat and add all the garlic butter ingredients. Use a wooden spatula to deglaze the pan (scrape up the flavorful bits stuck to the bottom of the pan). Cook until the garlic is soft, about 1-3 minutes.
- Serve the sauce over the meat. Garnish with parsley and cut into 1 to 1.5” medallions and serve.
- Let leftovers cool completely and then refrigerate in an airtight container for up to 2 days.
Notes
- If you’re using frozen venison, make sure the backstrap is fully thawed. Place it in the refrigerator to thaw overnight. Then place it on the counter for 1 hour before cooking.
- If the backstrap has a silver skin, remove it before cooking. This helps the meat cook evenly and prevents it from curling.
- Keep the backstrap as one piece of meat; don’t cut it into chunks or slices before cooking it.
- Add oil with a high-smoke point to the pan to get a good sear. This keeps it from sticking to the pan.


Comments & Reviews
Jamie says
Made this for date night and will be making it again next time! My husband adored it. I’m so glad we have some still in the freezer. Thanks a ton!
Erin @ Easy Wholesome says
Thank goodness for freezers, right. 😆 You’re welcome for the recipe and thank you for your feedback! I’m so glad you enjoyed it.
Brandy says
Delicious! Prepped and prepared as written, with the exception of using beef tallow to sear the venison in. it finished in the oven in about 6 minutes. Perfectly done, excellent flavor.
I did not make the garlic butter, maybe next time.
Thank you for a fabulous recipe!
Erin @ Easy Wholesome says
You’re welcome! I’m so glad that it came out well for you, and great that it was still tasty without the garlic butter. Thanks a bunch for your comment!
Todd says
I found some backstrap in the freezer today and made it as a surprise for my wife. She was a very happy lady! So was I. This is now “my” recipe and I’ll be making it again for us. It was so easy that even I could make it without difficulties. Thank you.
Erin @ Easy Wholesome says
You’re welcome! I’m really glad that you and your wife enjoyed it. 🙂 It’s great to hear that you’ll be making it again. Thanks for your comment!
Aisling says
This was SO good! A neighbor who was moving gave us some venison and I made this with it. I was worried about it drying out, but because I’m a scaredy cat, but keeping an eye on the temp and letting it rest made all the difference. Thanks for all the tips and for the recipe! LOVE it.
Erin @ Easy Wholesome says
Haha. I’m the same with the worrying! I’m really glad that the tips were helpful. 🙂 And wow, that was nice of your neighbor! Thanks so much for your comment.
Dorthy says
hands-down one of the best ways I’ve ever had venison. Got a nice crust on the outside while keeping it super tender inside. Thank you, ma’am.
Erin @ Easy Wholesome says
You’re welcome! I’m thrilled to hear it’s one of the best venison dishes you’ve had. Woohoo! Thanks so much for your comment.
Lisa Sprague says
This was a very good recipe. The only thing I would change next time is to use less salt. It was a bit salty for our taste, but will definitely make this again.
Erin @ Easy Wholesome says
I’m glad that you enjoyed the backstrap and will be making it again! Thanks for your comment. 🙂
Desiree Franklin says
This was excellent. Only adjustment was I cut down the sea salt to 1/2 because I only had fine sea salt on hand.
Erin @ Easy Wholesome says
I’m so glad that you liked the recipe! Thanks a bunch for your feedback. 🙂
Angela says
I made this for supper, my son was impressed. I love the simplicity of making steak like this. Great flavor and perfect color! Thank you!
Erin @ Easy Wholesome says
You’re welcome! I’m really glad that you and your son liked it. 🙂 Thanks so much for your feedback!
Cathleen says
This was so good!! I am always so afraid of cooking meat, but you made it so manageable. Thank you so much for sharing this recipe 🙂
Erin @ Easy Wholesome says
Yay! You’re welcome. And I’m glad that you found it manageable. 🙂 Thanks so much for your comment!
Mikayla says
SO good! We enjoyed the meat so much. I had to send the recipe to my brother as he has procured his own venison this year!
Erin @ Easy Wholesome says
That’s so nice to hear! I’m glad that you liked it. 🙂 Thanks for sharing the recipe with your brother and for your comment!